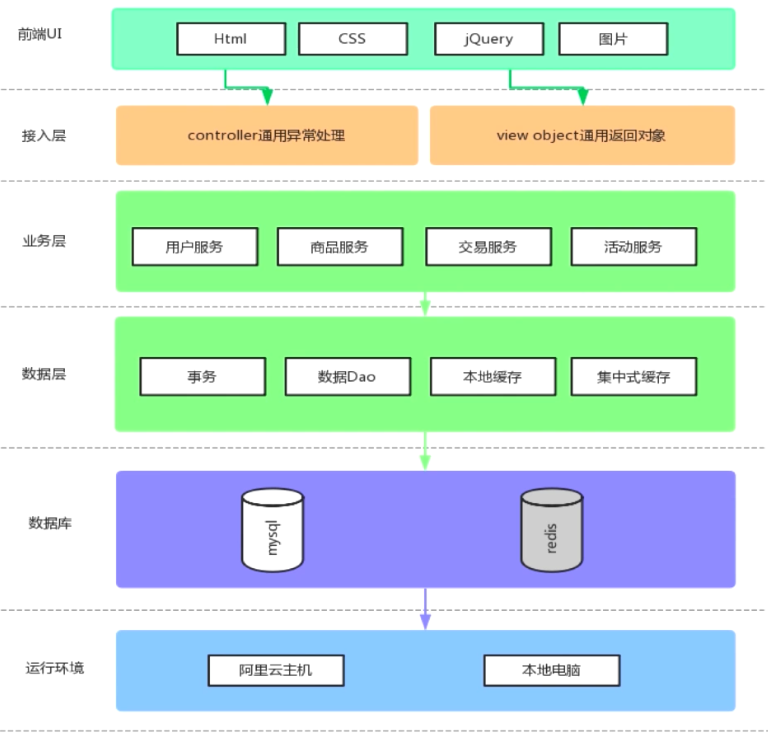
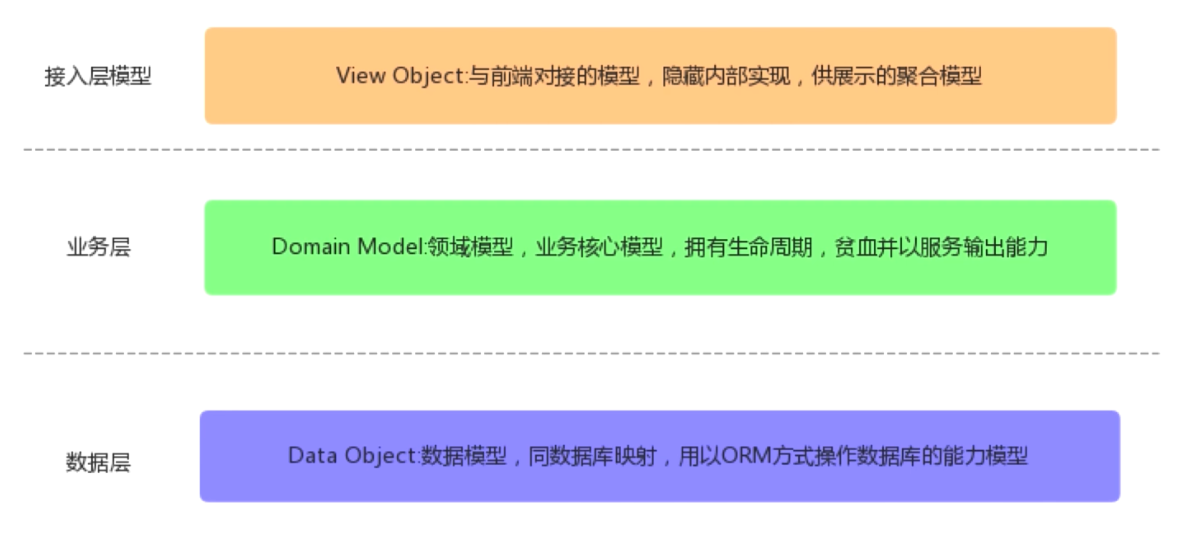
项目构成 三层模型
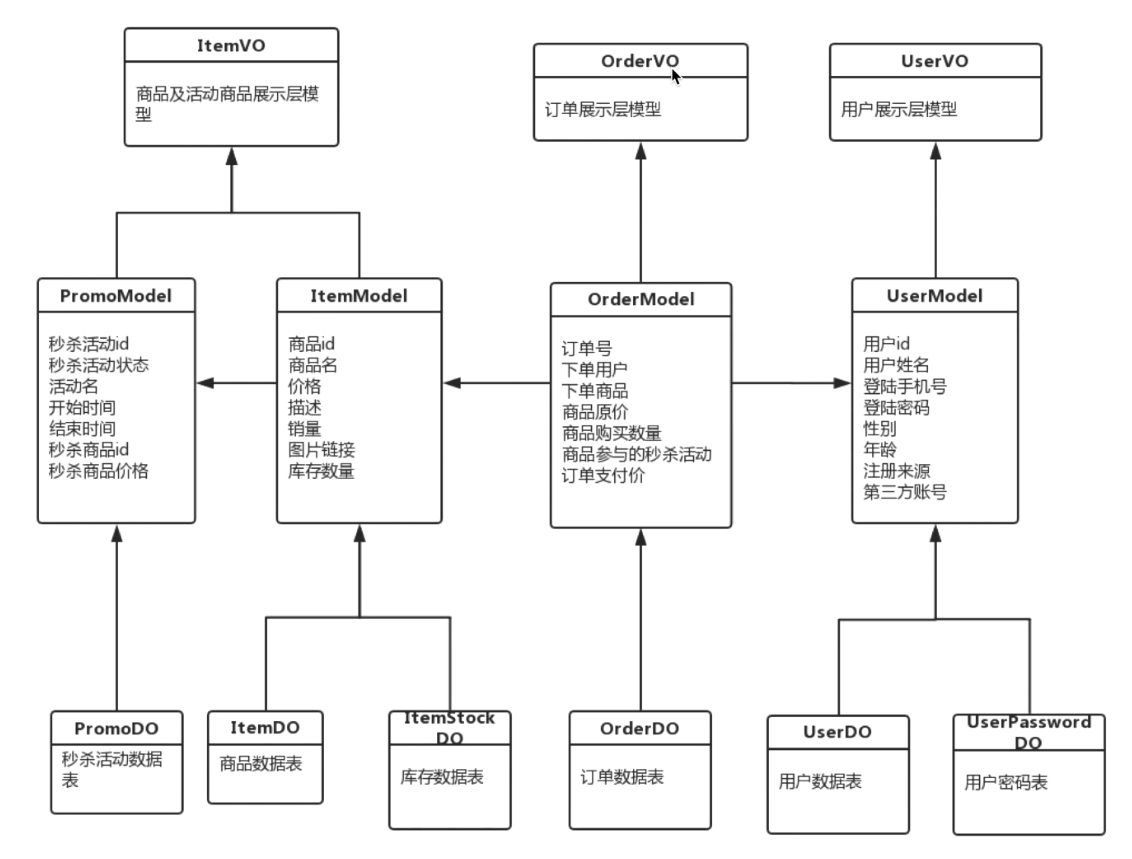
UML图
秒杀项目搭建 目标:
使用IDEA + Maven搭建SpringBoot开发环境 集成MyBatis操作数据库 实现秒杀项目 创建数据库表结构 user_info表,注意下面字段不包含用户密码,企业中一般密码是单独的表
1 2 3 4 5 6 7 8 9 10 11 12 13 14 DROP TABLE IF EXISTS `user_info` ;CREATE TABLE `user_info` ( `id` int NOT NULL AUTO_INCREMENT, `name` varchar (64 ) COLLATE utf8_unicode_ci NOT NULL DEFAULT '' , `gender` tinyint NOT NULL DEFAULT '0' COMMENT '1代表男性,2代表女性' , `age` int NOT NULL DEFAULT '0' , `telphone` varchar (255 ) COLLATE utf8_unicode_ci NOT NULL , `register_mode` varchar (255 ) COLLATE utf8_unicode_ci NOT NULL DEFAULT '' COMMENT '注册方式:手机号、微信、支付宝' , `third_party_id` varchar (64 ) COLLATE utf8_unicode_ci NOT NULL , PRIMARY KEY (`id` ) ) ENGINE =InnoDB DEFAULT CHARSET =utf8 COLLATE =utf8_unicode_ci;
user_password表,关联user_info主键
1 2 3 4 5 6 7 8 9 10 DROP TABLE IF EXISTS `user_password` ;CREATE TABLE `user_password` ( `id` int NOT NULL AUTO_INCREMENT, `encrpt_password` varchar (128 ) COLLATE utf8_unicode_ci NOT NULL DEFAULT '' , `user_id` int NOT NULL DEFAULT '0' , PRIMARY KEY (`id` ) ) ENGINE =InnoDB DEFAULT CHARSET =utf8 COLLATE =utf8_unicode_ci;
使用mybatis-genrator自动生产相关Object和mapper映射接口,xml映射文件
领域对象模型 即在service创建用户model,UserServiceImpl返回的是用户model对象。
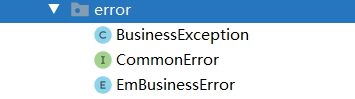
异常处理机制 创建异常接口、异常枚举类、Exception继承类(用于抛出异常)
在控制层UserController抛出异常(继承BaseController)
1 throw new BusinessException(EmBusinessError.USER_NOT_EXIST);
在基类控制层BaseController拦截异常,并返回CommonReturnType
1
2
3
4
5
6
7
8
9
10
11
12
13
14
15
16
17
18
@ExceptionHandler (Exception.class ) @ResponseStatus (HttpStatus .OK ) @ResponseBody public Object handlerException (HttpServletRequest request , Exception ex ) { Map<String, Object> responseData = new HashMap<>(); if (ex instanceof BusinessException) { BusinessException businessException = (BusinessException) ex; responseData.put("errCode" , businessException.getErrCode()); responseData.put("errMsg" , businessException.getErrMsg()); } else { responseData.put("errCode" , EmBusinessError.UNKONWN_ERROR.getErrCode()); responseData.put("errMsg" , EmBusinessError.UNKONWN_ERROR.getErrMsg()); } return CommonReturnType.create(responseData, "fail" ); } }
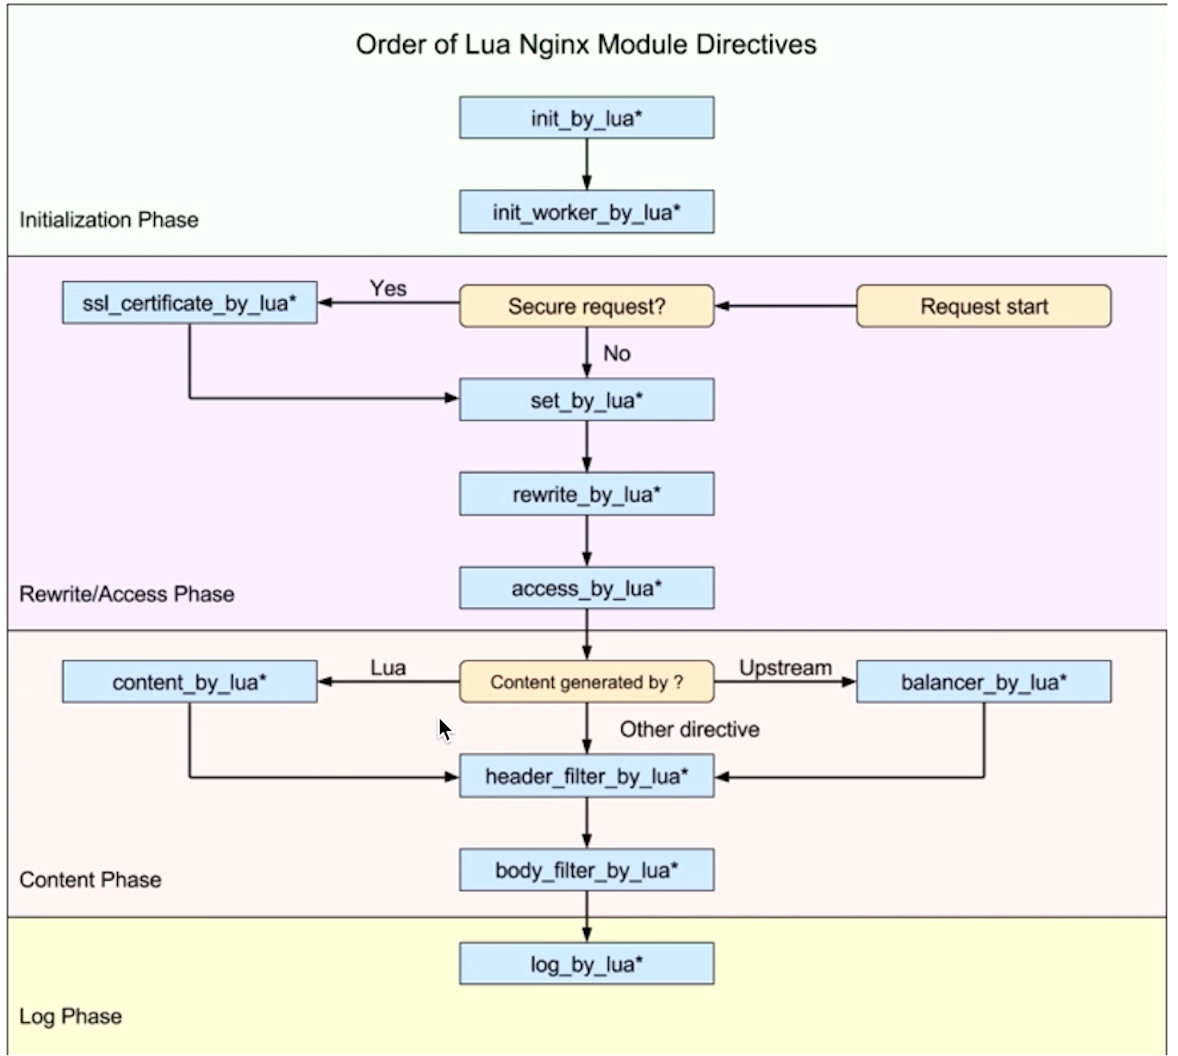
用户信息管理 ◆otp短信获取
短信获取—控制层
1 2 3 4 5 6 7 8 9 10 11 12 13 14 15 16 17 18 19 @PostMapping (value = "/getotp" , consumes = CONTENT_TYPE_FORMED)@CrossOrigin public CommonReturnType getOtp (@RequestParam("telphone" ) String telphone) Random random = new Random(); int randomInt = random.nextInt(99999 ); randomInt +=10000 ; String otpCode = String.valueOf(randomInt); httpServletRequest.setAttribute(telphone, otpCode); log.info("telphone = " + telphone + " & otpCode = " + otpCode); return CommonReturnType.create(null ); }
短信校验—服务层
1
2
3
4
5
6
7
8
9
10
11
12
13
14
15
16
17
@Override public UserModel validatelogin (String telphone, String encrptpassword) throws BusinessException UserDO userDO = userDOMapper.selectByTelphone(telphone); if (userDO == null ){ throw new BusinessException(EmBusinessError.USER_LOGIN_FAIL); } UserPasswordDO userPasswordDO = userPasswordDOMapper.selectByPrimaryKey(userDO.getId()); UserModel userModel = convertFromDataObject(userDO, userPasswordDO); if (!StringUtils.equals(encrptpassword, userModel.getEncrptPassword())){ throw new BusinessException(EmBusinessError.USER_LOGIN_FAIL); } return userModel; }
注册—服务层
1
2
3
4
5
6
7
8
9
10
11
12
13
14
15
16
17
18
19
20
21
22
23
24
25
26
27
28
29
30
31
32
33
34
@Override @Transactional public void register (UserModel userModel) throws BusinessException if (userModel == null ){ throw new BusinessException(EmBusinessError.PARAMETER_VALIDATION_ERROR); } ValidationResult result = validator.validate(userModel); if (result.isHasErrors()){ throw new BusinessException(EmBusinessError.PARAMETER_VALIDATION_ERROR, result.getErrMsg()); } UserDO userDO = convertFromModel(userModel); try { userDOMapper.insertSelective(userDO); }catch (DuplicateKeyException ex){ throw new BusinessException(EmBusinessError.PARAMETER_VALIDATION_ERROR, "手机号已重复注册" ); } userModel.setId(userDO.getId()); UserPasswordDO userPasswordDO = convertPasswordFromModel(userModel); userPasswordDOMapper.insertSelective(userPasswordDO); }
登录—控制层
1 2 3 4 5 6 7 8 9 10 11 12 13 14 15 16 17 @PostMapping (value = "/login" , consumes = CONTENT_TYPE_FORMED)public CommonReturnType login (@RequestParam("telphone" ) String telphone, @RequestParam ("password" ) String password) throws BusinessException, UnsupportedEncodingException, NoSuchAlgorithmException { if (StringUtils.isEmpty(telphone)||StringUtils.isEmpty(password)){ throw new BusinessException(EmBusinessError.PARAMETER_VALIDATION_ERROR); } UserModel userModel = userService.validatelogin(telphone, this .EncodeByMD5(password)); this .httpServletRequest.getSession().setAttribute("IS_LOGIN" , true ); this .httpServletRequest.getSession().setAttribute("LOGIN_USER" , userModel); return CommonReturnType.create(null ); }
解决跨域session共享问题:https://blog.csdn.net/lalala323/article/details/103625625
for update 行级锁 for update是一种行级锁,又叫排它锁,一旦用户对某个行施加了行级加锁,则该用户可以查询也可以更新被加锁的数据行,其它用户只能查询但不能更新被加锁的数据行.如果其它用户想更新该表中的数据行,则也必须对该表施加行级锁.即使多个用户对一个表均使用了共享更新,但也不允许两个事务同时对一个表进行更新,真正对表进行更新时,是以独占方式锁表,一直到提交或复原该事务为止。行锁永远是独占方式锁。
只有当出现如下之一的条件,才会释放共享更新锁:
Joda-Time 时间API 使用该日期处理类替代java自带的,参考https://blog.csdn.net/psh18513234633/article/details/79408096
项目回顾 推荐在SpringMVC架构中,领域模型使用贫血模型,即只提供对应属性的getter和setter方法,将后端处理逻辑放在service层
统一的异常处理器 在之前的项目中,异常处理器设置在BaseController基类中,由其它Controller继承该基类从而实现异常处理,这样存在的问题是,无法拦截不进入Controller的异常 ,所以需要使用Spring切面编程来拦截GlobalExceptionHandler
1
2
3
4
5
6
7
8
9
10
11
12
13
14
15
16
17
18
19
20
21
22
23
24
25
26
27
28
@ControllerAdvice public class GlobalExceptionHandler @ExceptionHandler (Exception.class ) @ResponseBody public CommonReturnType doError (HttpServletRequest httpServletRequest , HttpServletResponse httpServletResponse , Exception ex ) { ex.printStackTrace(); Map<String, Object> responseData = new HashMap<>(); if (ex instanceof BusinessException){ BusinessException businessException = (BusinessException)ex; responseData.put("errCode" , businessException.getErrCode()); responseData.put("errMsg" , businessException.getErrMsg()); }else if (ex instanceof ServletRequestBindingException){ responseData.put("errCode" , EmBusinessError.UNKONWN_ERROR.getErrCode()); responseData.put("errMsg" , "url绑定路由问题" ); }else if (ex instanceof NoHandlerFoundException){ responseData.put("errCode" , EmBusinessError.UNKONWN_ERROR.getErrCode()); responseData.put("errMsg" , "没有找到对应的访问路径" ); }else { responseData.put("errCode" , EmBusinessError.UNKONWN_ERROR.getErrCode()); responseData.put("errMsg" , EmBusinessError.UNKONWN_ERROR.getErrMsg()); } return CommonReturnType.create(responseData, "fail" ); } }
在YML文件开启MVC相关异常
1
2
3
4
mvc: throw-exception-if-no-handler-found: true resources: add-mappings: false
云端部署 项目打包成jar文件,数据库使用mysqldump备份,然后后果scp命令上传到服务器
编写deploy脚本
1 nohup java -Xms150m -Xmx300m -XX:NewSize=200m -XX:MaxNewSize=200m -jar miaosha.jar --spring.config.addition-location=/var/wwww/miaosha/application.yml
后台启动脚本
查看控制台
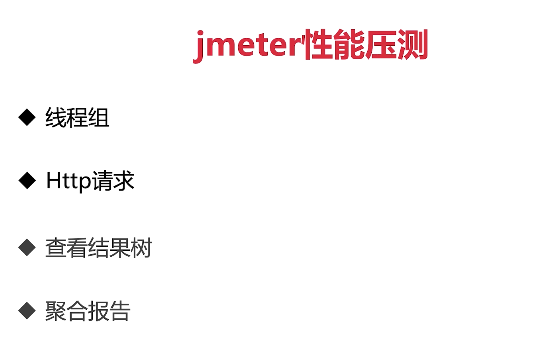
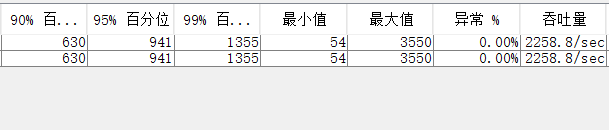
性能压测 主要关注聚合报告的95线和TPS(QPS)数量
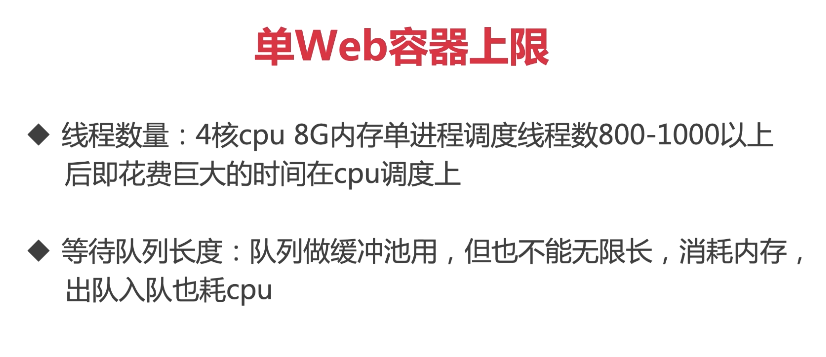
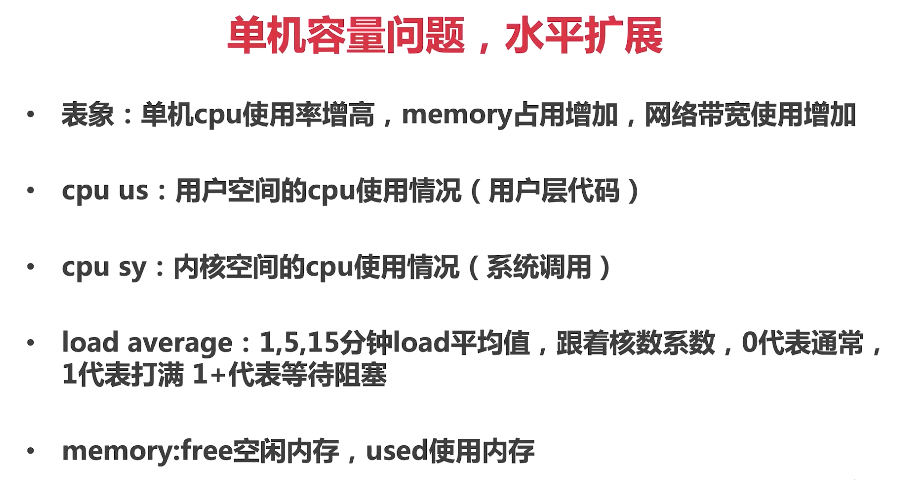
发现并发容量问题 首先使用ps -ef | grep java 命令找到对应进程编号,如1313,然后使用pstree -p 1313 |wc -l查看其线程数量
关于top -H参数的了解:
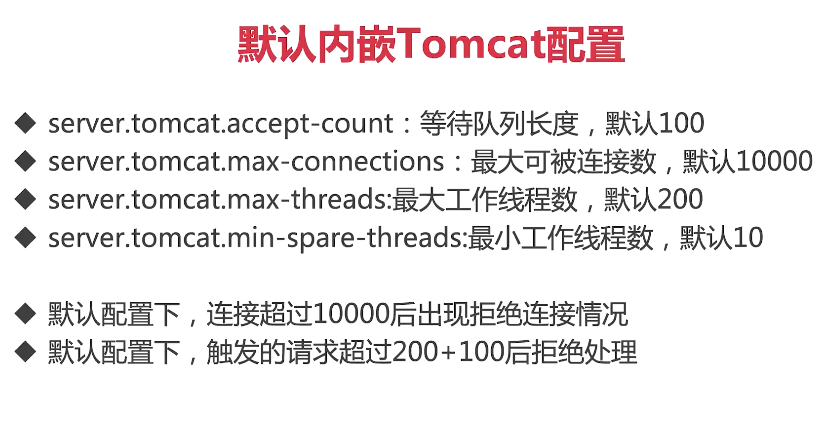
CPU一行的:us代表用户态对CPU的占有率,同理sy代表内核态对CPU的占有率 第一行的:load average代表最近几分钟cpu的加载率,三个数分别代表不同时间段的系统平均负载(一分钟、五 分钟、以及十五分钟),它们的数字当然是越小越好。数字越高,说明服务器的负载越大,这也可能是服务器出现某种问题的信号。 SpringBoot默认的配置在spring-configuration-metadata.json下,该文件中指定了tomcat默认的线程数量
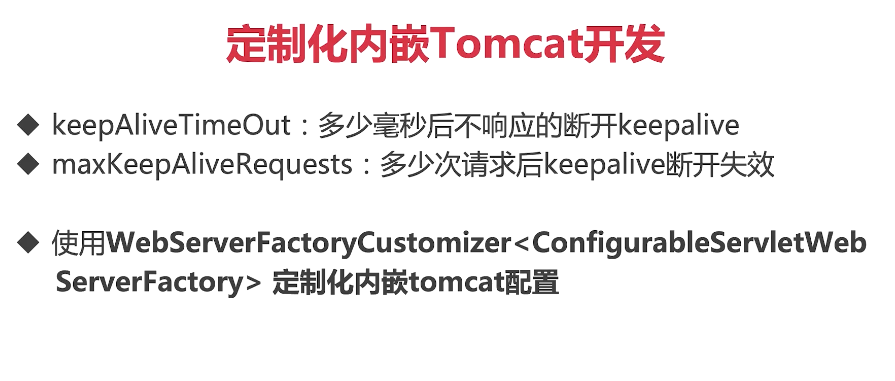
Tomcat连接定制
编写定制类WebServerConfiguration:
1 2 3 4 5 6 7 8 9 10 11 12 13 14 15 16 17 18 19 20 21 22 23 24 25 @Component public class WebServerConfiguration implements WebServerFactoryCustomizer <ConfigurableWebServerFactory > { @Override public void customize (ConfigurableWebServerFactory factory) ((TomcatServletWebServerFactory)factory).addConnectorCustomizers(new TomcatConnectorCustomizer() { @Override public void customize (Connector connector) Http11NioProtocol protocolHandler = (Http11NioProtocol) connector.getProtocolHandler(); protocolHandler.setKeepAliveTimeout(30000 ); protocolHandler.setMaxKeepAliveRequests(10000 ); } }); } }
容量问题优化 :
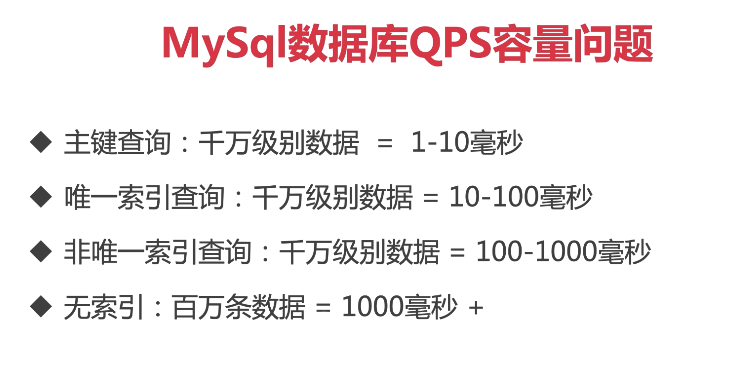
MySql QPS问题: Queries Per Second,意思是每秒查询率,是一台服务器每秒能够响应的查询次数(数据库中的每秒执行查询sql的次数),显然,这个不够全面,不能描述增删改,所以,不建议用qps来作为系统性能指标。
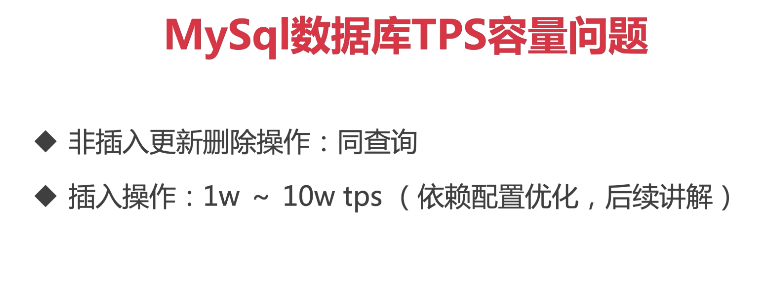
MySql TPS问题: Transactions Per Second,意思是每秒事务数,具体事务的定义,都是人为的,可以一个接口、多个接口、一个业务流程等等。一个事务是指事务内第一个请求发送到接收到最后一个请求的响应的过程,以此来计算使用的时间和完成的事务个数。
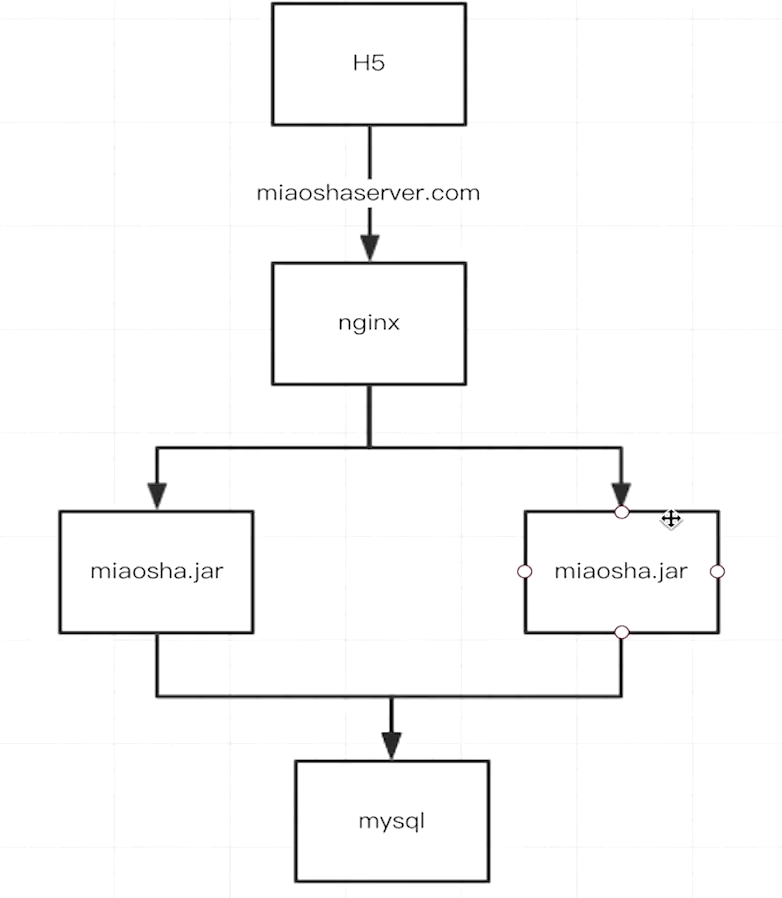
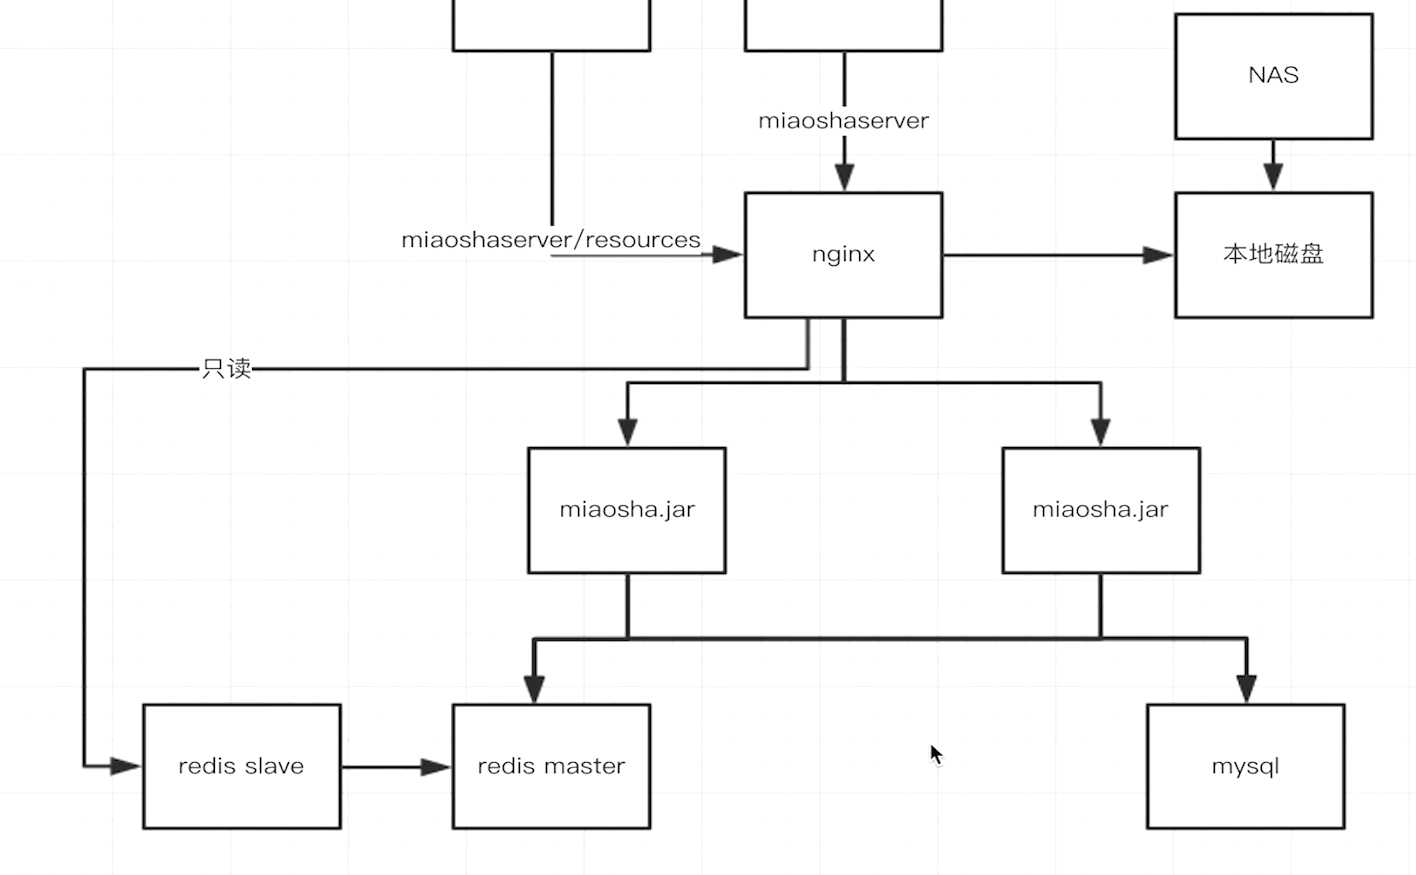
分布式扩展 目标:
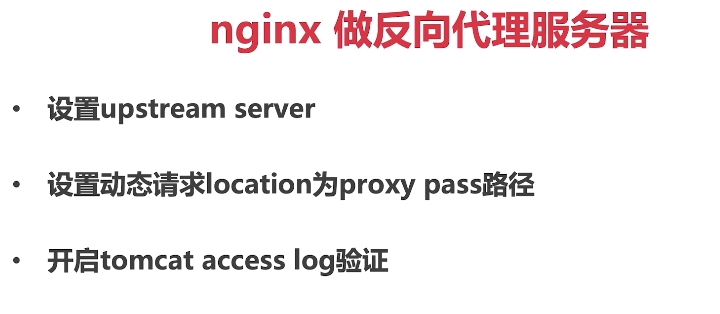
Nginx反向代理负载均衡 分布式会话管理 使用redis实现分布式会话存储 单机容量问题:
水平扩展:
新的架构图:
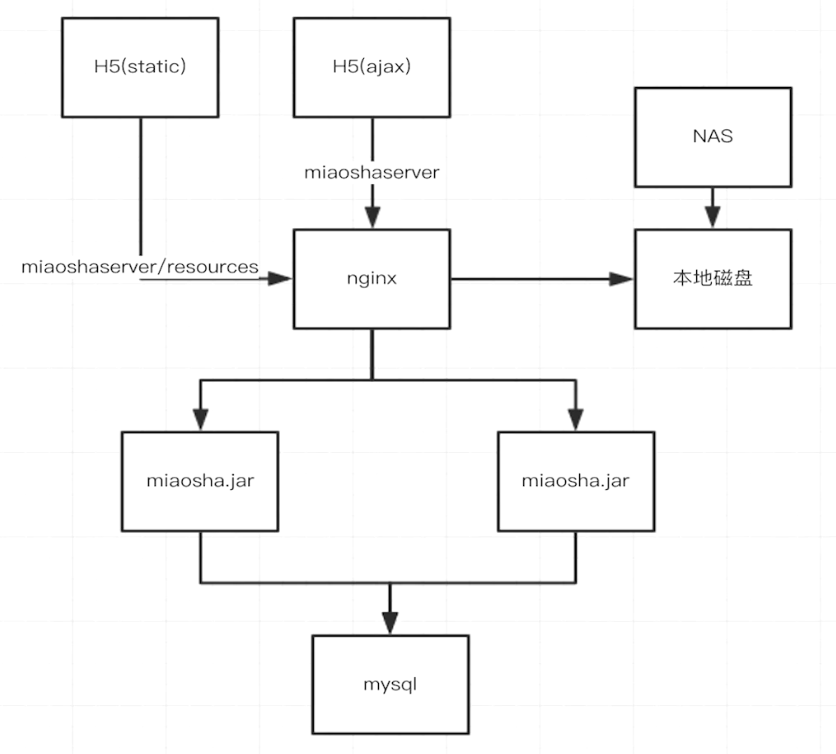
Nginx动静分离、反向代理:在Nginx的/resources下存放静态资源,其它请求转发到后端服务器
使用OpenResty工具来简化Nginx的编译配置,因为Nginx不支持动态连接,手动编译的工作量很大,安装流程http://openresty.org/cn/linux-packages.html
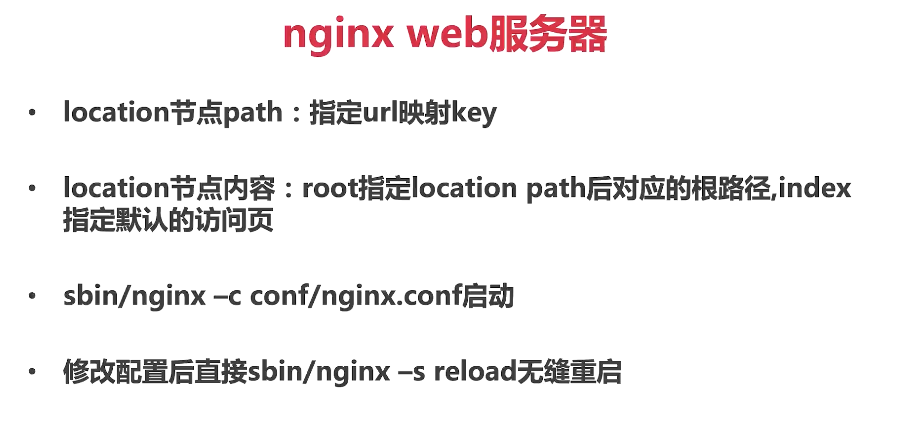
使用Ngnix web服务器:
nginx动静分离服务:
location节点其他路径:动态资源用 location节path特定resources:静态资源路径
注意反向代理时:应该将静态网页中的ajax请求设置为Nginx服务器公网IP,千万不能设置为Nginx内网IP ,因为Ajax请求是在公网上发出的,并不能访问局域网。
Tomcat日志配置:
1
2
3
4
accesslog: enabled: true directory: /var/www/miaosha/tomcat pattern: '%h %l %u %t "%r" %s %b %D'
查看 tail -f tomcat/access_log.2020-08-31.log :
1 172.25.25.161 - - [31/Aug/2020:17:37:41 +0800] "GET /item/get?id=21 HTTP/1.0" 200 447 1226
开启Ngnix反向代理到内网服务器的长链接:减少tcp握手的消耗
1
2
3
4
5
6
7
8
9
10
11
12
13
14
15
16
17
18
19
upstream backend_server{ server 172.25.25.160 weight=1; server 172.25.25.159 weight=1; keepalive 30; #开启长连接 } location /resources/ { alias /usr/local/openresty/nginx/html/resources/; #alias作用为:命中则替换 index index.html index.htm; } location / { proxy_pass http://backend_server; proxy_set_header Host $http_host:$proxy_port; proxy_set_header X-Real-IP $remote_addr; proxy_set_header X-Forwarded-For $proxy_add_x_forwarded_for; proxy_http_version 1.1; #必须设置http1.1才支持长连接 proxy_set_header Connection ""; #必须设置为空 }
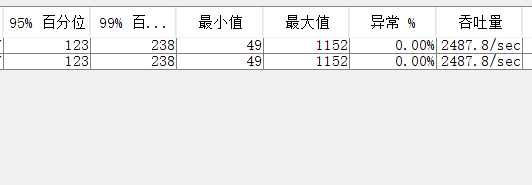
经Jmeter测试1000个线程循环30次在以下条件:
mysql服务器:2核8g 20mbps 秒杀服务器1:2核8g 3mbps 秒杀服务器2:2核8g 3mbps Nginx服务器:2核8g 25mbps 默认开启内网各服务器之间的长连接 结果如图:
Nginx高性能服务器的原因:
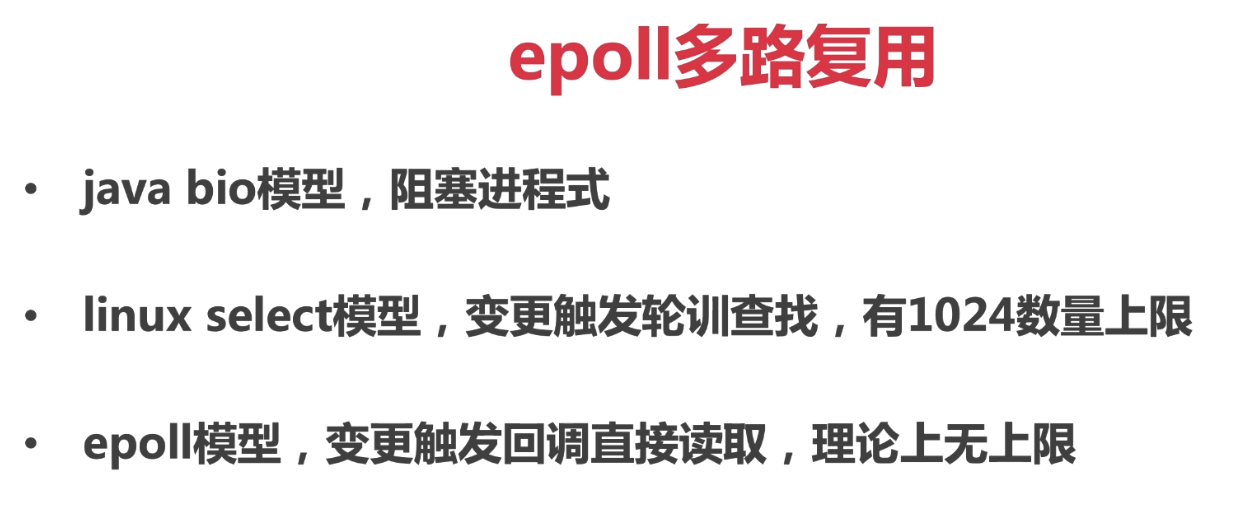
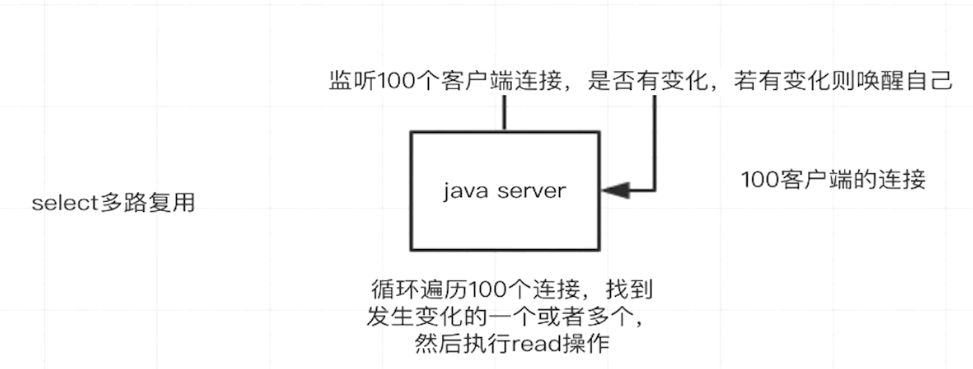
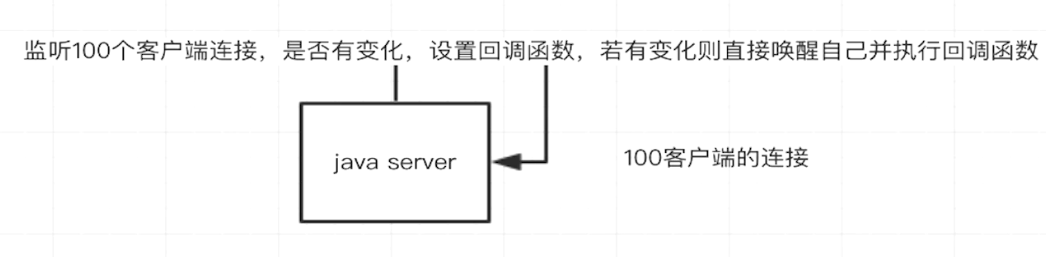
epoll多路复用 master worker进程模型 协程机制 select多路复用:
epoll模型:
JDK的NIO模型是借鉴了select模型核epoll建立的,其在linux 2.6以上内核运作时,便采用epoll模型 ;Dubbo的netty框架也是基于epoll模型的。
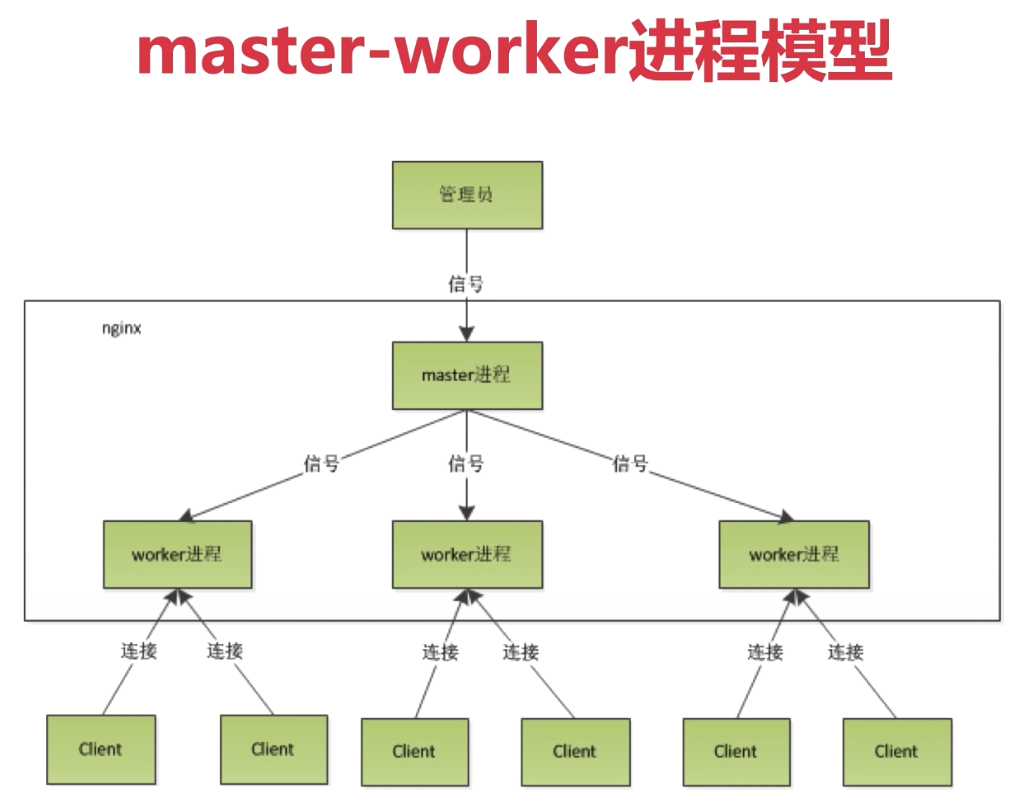
Nginx master-worker进程模型:
说明:
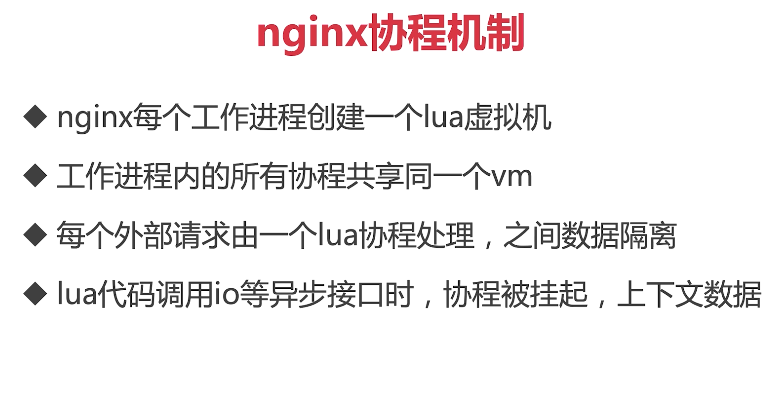
master进程负责处理管理员命令和管理worker进程,实际上是worker进程在内存抢占资源锁来连接或拒绝socket请求。 worker进程只有一个线程,但并不意味着它的效率低,实际上当线程内部没有阻塞操作时,单线程比多线程更快速,worker内部是不允许存在阻塞线程的,阻塞操作(如I/O)必须交给epoll模型 Nginx协程机制:
依附于线程的内存模型,切换开销小 遇阻塞及归还执行权,代码同步 无需加锁 协程是一个内存模型,本质上还是一个线程,只不过一个线程可以有多个协程,协程不同于线程,协程切换没有CPU的切换开销,只有内存的切换开销。 lua/golang语言都有协程机制
会话管理:
基于cookie传输sessionid : java tomcat容器session实现 基于token传输类似sessionid : java代码session实现 (推荐)基于cookie的方式,会在cookie中携带Jsession作为session的id
然而在上面的分布式场景下,上面的两种方式都会存在问题,因为nginx进行轮询时两台tomcat服务器之间的session是无法共享的,会出现不停提示登录的问题。
使用分布式会话:
基于cookie传输sessionid : java tomcat容器session实现迁移到 基于token传输类似sessionid : java代码session实现迁移到redis 引入POM
1 2 3 4 5 6 7 8 9 10 <dependency > <groupId > org.springframework.boot</groupId > <artifactId > spring-boot-starter-data-redis</artifactId > </dependency > <dependency > <groupId > org.springframework.session</groupId > <artifactId > spring-session-data-redis</artifactId > </dependency >
RedisConfig
1
2
3
4
5
@Component @EnableRedisHttpSession (maxInactiveIntervalInSeconds = 3600 ) public class RedisConfig }
注意要放入redis中的session数据必须实现序列化接口或者修改redis默认的序列化方式
基于token传输:使用token传输可以避免移动设备不支持发送cookie的情况,兼容性更好
1 2 3 4 5 6 7 8 9 10 String uuidToken = UUID.randomUUID().toString(); redisTemplate.opsForValue().set(uuidToken, userModel); redisTemplate.expire(uuidToken, 1 , TimeUnit.HOURS); return CommonReturnType.create(uuidToken);
前端可以用localStorage存储token
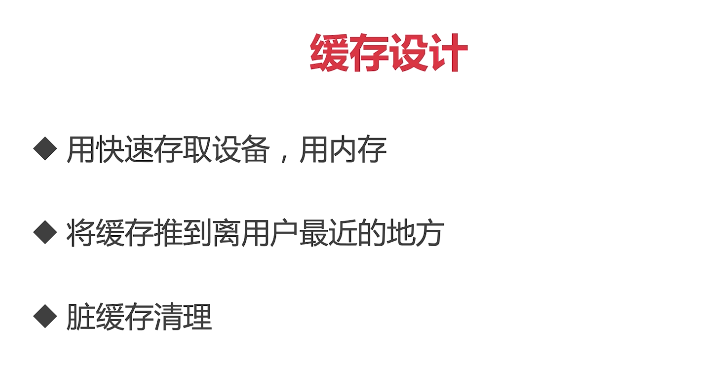
查询优化之多级缓存 多级缓存策略:
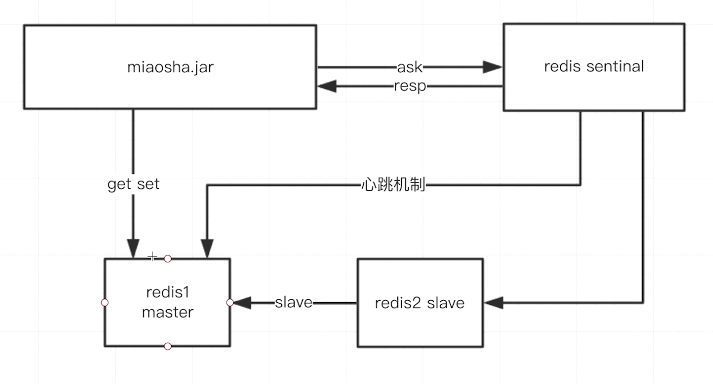
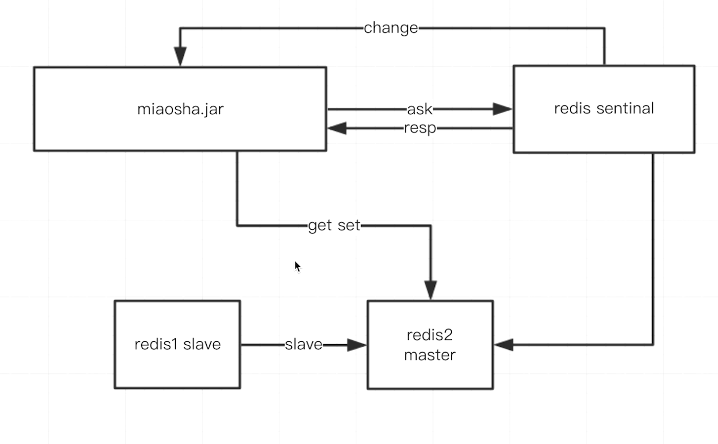
redis缓存 —一级缓存 集中式的缓存管理 热点内存本地缓存 —–二级缓存nginx proxy cache缓存 —–三级缓存nginx lua缓存 redis的sentinel哨兵模式:
一旦sentinel检测到心跳丢失,会切换主从并发送信号给miaosha.jar:
redis集群cluster模式:是一个雪花状集群,客户端只需要连接任意一台redis服务器即可,一旦某一台机器挂了,redis服务器会自带提示客户端重新拉取状态信息。
商品详情页动态内容实现 1 2 3 4 5 6 7 8 9 10 ItemModel itemModel = (ItemModel) redisTemplate.opsForValue().get("item_" + id); if (itemModel == null ){ itemModel = itemService.getItemById(id); redisTemplate.opsForValue().set("item_" + id, itemModel); redisTemplate.expire("item_" + id, 10 , TimeUnit.MINUTES); }
修改redis默认的序列化机制
由于对于秒杀的日期类型使用的JodaTime的DateTime,必须要手动实现其序列化和反序列化到redis的Json String样式。
序列化类
1 2 3 4 5 6 7 8 9 10 11 12 public class JodaDateTimeJsonSerializer extends JsonSerializer <DateTime > @Override public void serialize (DateTime dateTime, JsonGenerator jsonGenerator, SerializerProvider serializerProvider) throws IOException jsonGenerator.writeString(dateTime.toString("yyyy-MM-dd HH:mm:ss" )); } }
反序列化类
1 2 3 4 5 6 7 8 9 10 11 12 13 14 public class JodaDateTimeJsonDeserializer extends JsonDeserializer <DateTime > @Override public DateTime deserialize (JsonParser jsonParser, DeserializationContext deserializationContext) throws IOException, JsonProcessingException String s = jsonParser.readValueAs(String.class ) ; DateTimeFormatter dateTimeFormatter = DateTimeFormat.forPattern("yyyy-MM-dd HH:mm:ss" ); return DateTime.parse(s, dateTimeFormatter); } }
redis 配置类:使用上面的序列化和反序列化方式
1 2 3 4 5 6 7 8 9 10 11 12 13 14 15 16 17 18 19 20 21 22 23 24 25 26 27 28 29 30 31 32 33 34 35 @Component @EnableRedisHttpSession (maxInactiveIntervalInSeconds = 3600 ) public class RedisConfig @Bean public RedisTemplate redisTemplate (RedisConnectionFactory redisConnectionFactory) RedisTemplate redisTemplate = new RedisTemplate(); redisTemplate.setConnectionFactory(redisConnectionFactory); StringRedisSerializer stringRedisSerializer = new StringRedisSerializer(); redisTemplate.setKeySerializer(stringRedisSerializer); Jackson2JsonRedisSerializer jackson2JsonRedisSerializer = new Jackson2JsonRedisSerializer(Object.class ) ; ObjectMapper objectMapper = new ObjectMapper(); SimpleModule simpleModule = new SimpleModule(); simpleModule.addSerializer(DateTime.class , new JodaDateTimeJsonSerializer ()) ; simpleModule.addDeserializer(DateTime.class , new JodaDateTimeJsonDeserializer ()) ; objectMapper.activateDefaultTyping(LaissezFaireSubTypeValidator.instance, ObjectMapper.DefaultTyping.NON_FINAL, JsonTypeInfo.As.PROPERTY); objectMapper.registerModule(simpleModule); jackson2JsonRedisSerializer.setObjectMapper(objectMapper); redisTemplate.setValueSerializer(jackson2JsonRedisSerializer); return redisTemplate; } }
再次部署发现,使用redis能明显提高并发量:
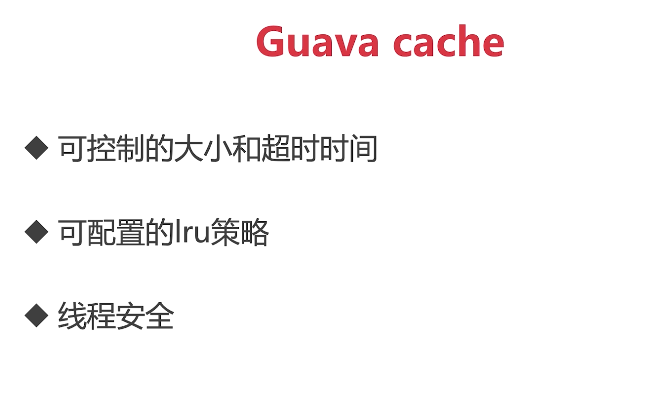
本地热点缓存 对于超高频的数据,访问redis依然会有比较大的开销,所以设计本地热点数据缓存非常有必要
热点数据 脏读不敏感 内存可控 理论上要满足后面两点,本地缓存必须比redis生命周期要短 。
注意:本地缓存不能使用ConcurrentHashMap,因为put操作加锁后对读锁的性能影响较大,而且还要考虑淘汰机制
使用Guava cache:
引入POM
1 2 3 4 5 <dependency > <groupId > com.google.guava</groupId > <artifactId > guava</artifactId > <version > 22.0</version > </dependency >
定义CacheServiceImpl
1 2 3 4 5 6 7 8 9 10 11 12 13 14 15 16 17 18 19 20 21 22 23 24 25 26 27 28 29 30 @Service public class CacheServiceImpl implements CacheService private Cache<String, Object> commonCache = null ; @PostConstruct public void init () commonCache = CacheBuilder.newBuilder() .initialCapacity(10 ) .maximumSize(100 ) .expireAfterWrite(60 , TimeUnit.SECONDS) .build(); } @Override public void setCommonCache (String key, Object value) commonCache.put(key, value); } @Override public Object getFromCommonCache (String key) return commonCache.getIfPresent(key); } }
然后取数据的顺序为:先找本地缓存,本地不存在找redis,然后再找mysql
再次测试Jmeter可以达到3000TPS
nginx proxy cache缓存 nginx反向代理前置 依靠文件系统存索引级的文件 依靠内存缓存文件地址 由于nginx的缓存使用的是文件系统,并非缓存在内存上,所以这样配置并不能提高并发量
nginx lua
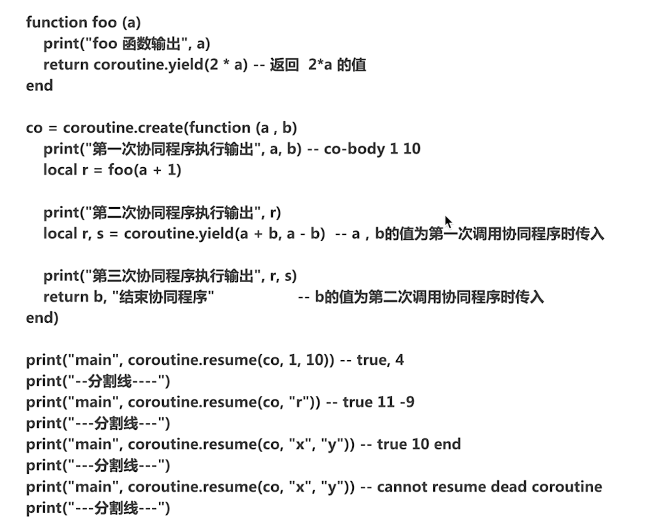
lua协程机制
nginx协程
举例:nginx遇到请求需要反向代理到后端服务器,等待后端服务器返回,协程便放弃自己的执行权限,将与后端的socket事件注册到epoll事件中 ,等待epoll事件被唤醒回调,nginx又会创建新的协程来完成后续操作
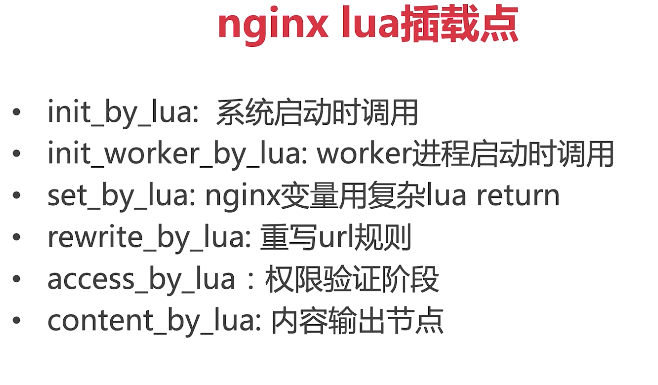
lua插载点
常用插载点
OpenResty实践
openresty hello world shared dic:共享内存字典,所有worker进程可见,Iru淘汰lua脚本使用share dic
1 2 3 4 5 6 7 8 9 10 11 12 13 14 15 16 17 18 19 20 21 22 23 function get_from_cache (key) local cache_ngx = ngx.shared.my_cache local value = cache_ngx.get(key) return value end function set_to_cache (key, value, exptime) if not exptime then exptime = 0 end local cache_ngx = ngx.shared.my_cache local succ, err, forcible = cache_ngx:set(key, value, exptime) return succ end local args = ngx.req.get_uri_args()local id = args["id" ]local item_model = get_from_cache("item_" ..id)if item_model = nil then local resp = ngx.location.capture("/item/get?id=" ..id) item_model = resp.body set_to_cache("item_" ..id, item_model, 1 *60 ) end
nginx使用redis
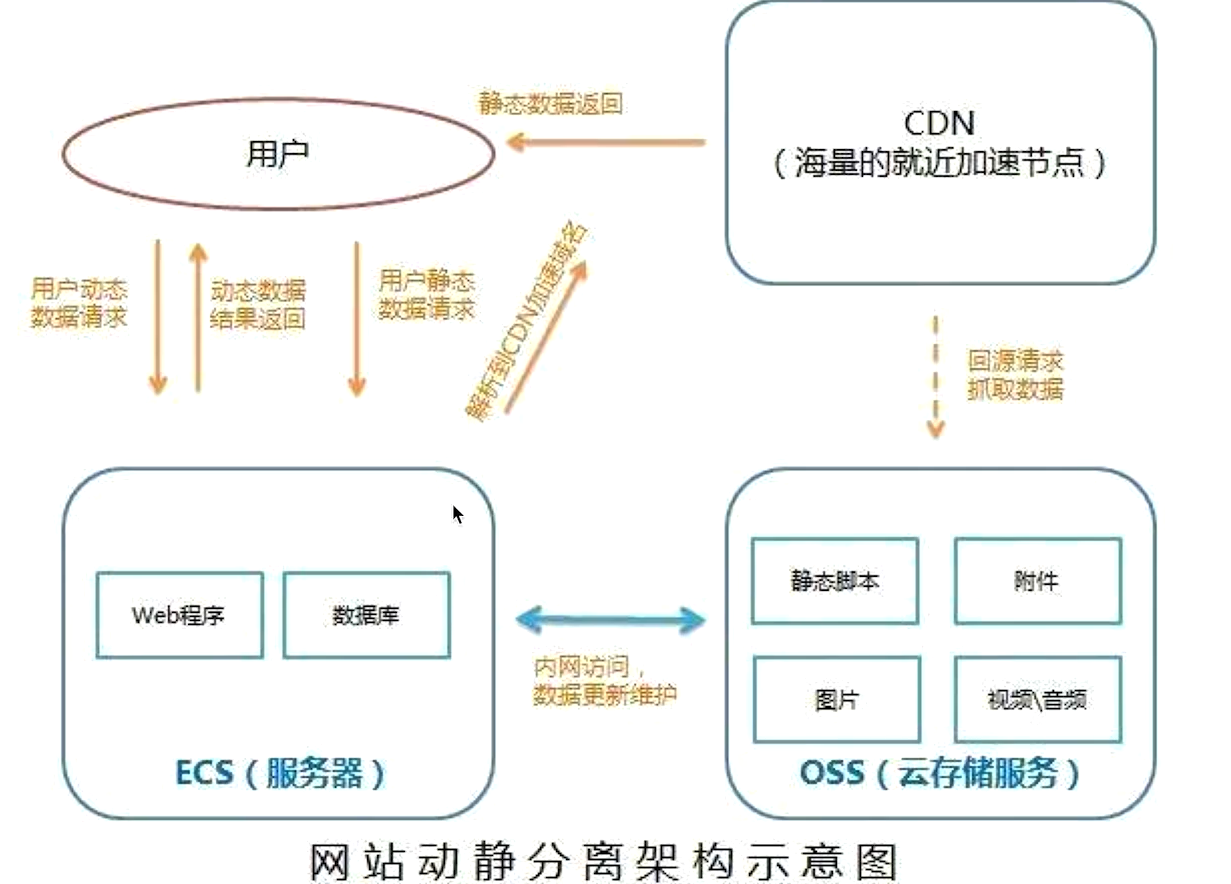
查询优化之页面静态化 静态请求CDN
回源缓存
有效性判断
浏览器刷新方式
ctrl+F5或commond+shift+R刷新:去掉cache-control 协商机制,比较Last-modified和ETag到服务端,若服务端 CDN自定义缓存策略
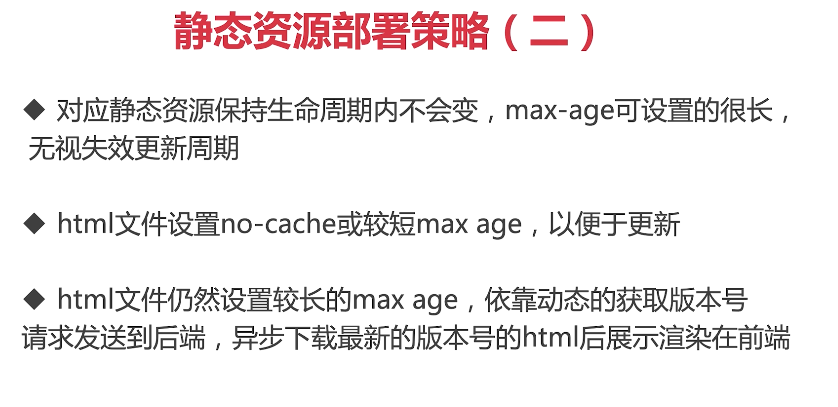
静态资源部署策略
全页面静态化 定义:
在服务端完成html , css,甚至js的load渲染成纯html文件后直接以静态资源的方式部署到cdn上 全页面静态化技术类似于爬虫技术
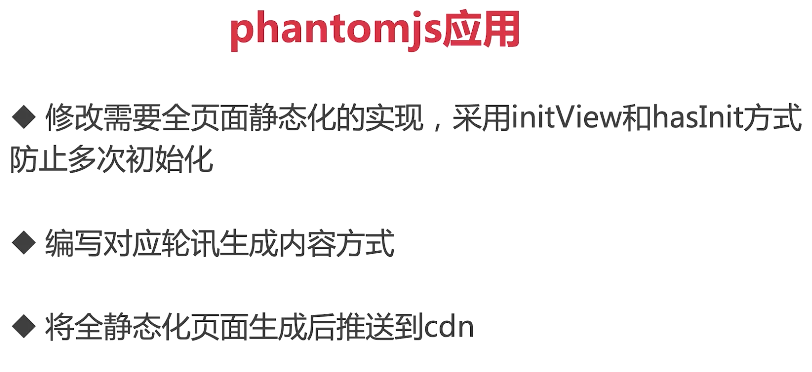
phantomjs
示例:首先编写一个爬虫js文件,该爬虫负责获取前端页面
1 2 3 4 5 6 7 8 9 10 11 12 13 14 15 16 17 18 19 20 var page = require ("webpage" ).create();var fs = require ("fs" );page.open("http://localhost:8080/resources/getitem.html?id=21" , function (status ) console .log("status = " + status); var isInit = "0" ; setInterval(function ( if (isInit != "1" ){ page.evaluate(function ( initView(); }); isInit = page.evaluate(function ( return hasInit(); }); }else { fs.write("getitem.html" , page.content, "w" ); phantom.exit(); } }, 1000 ); })
修改前端页面:使得ajax请求可以被爬虫控制
1 2 3 4 5 6 7 8 9 10 11 12 13 14 15 16 17 18 19 20 21 22 23 24 25 26 27 28 29 30 31 32 33 34 35 36 37 38 39 40 <input type="hidden" id="isInit" value="0" /> function hasInit ( var isInit = $("#isInit" ).val(); return isInit; } function setHasInit ( $("#isInit" ).val("1" ); } function initView ( var isInit = hasInit(); if (isInit == "1" ){ return ; } $.ajax({ type:"GET" , url: "http://" +g_host+"/item/get" , data:{ "id" : getParam("id" ), }, xhrFields:{withCredentials :true }, success:function (data ) if (data.status == "success" ){ g_itemVO = data.data; reloadDom(); setInterval(reloadDom, 1000 ); setHasInit(); }else { alert("获取信息失败,原因为" +data.data.errMsg) } }, error:function (data ) alert("获取信息失败,原因为" +data.responseText) }, }) }
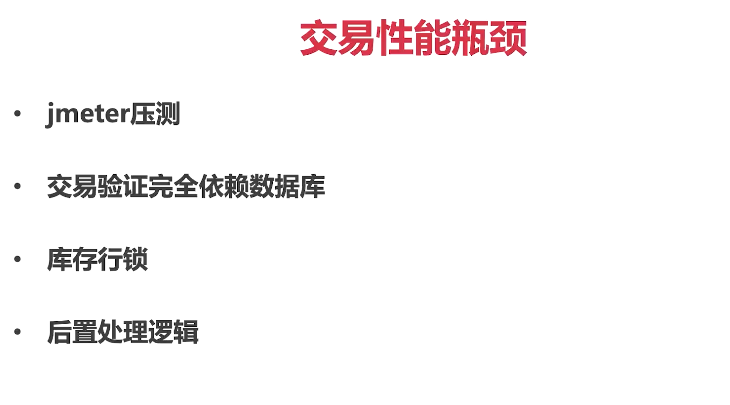
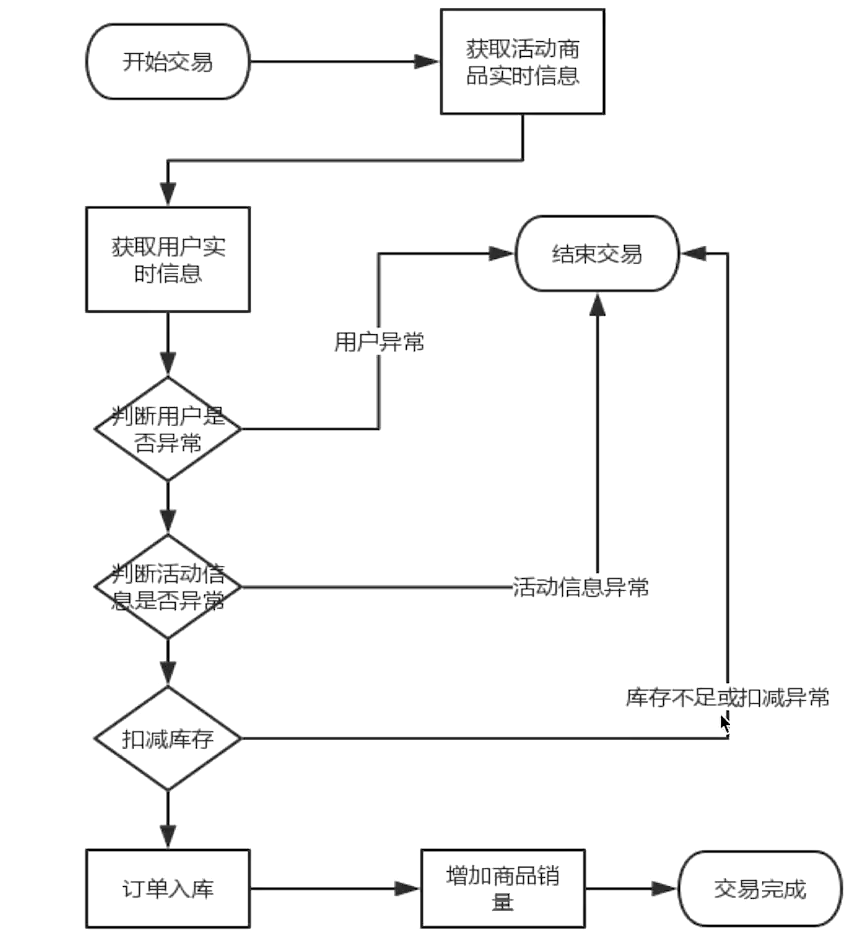
交易优化之缓存库存 下单的性能瓶颈:
一次下单至少产生6次的数据库I/O操作,实际上是非常耗时的
上面的用户信息和活动信息查询都可以使用redis缓存来优化,Jmeter压测结果提升会相当明显
库存表添加索引:因为每次写都添加行锁必然要对应有索引,不然速度会很慢
1 ALTER TABLE item_stock add UNIQUE INDEX item_id_index(item_id)
库存行锁优化
扣减库存缓存化 异步同步数据库 库存数据库最终一致性保证 活动发布服务
1 2 3 4 5 6 7 8 9 10 11 12 13 @Override public void publishPromo (Integer promoId) PromoDO promoDO = promoDOMapper.selectByPrimaryKey(promoId); if (promoDO.getItemId() == null || promoDO.getItemId().intValue() == 0 ){ return ; } ItemModel itemModel = itemService.getItemById(promoDO.getItemId()); redisTemplate.opsForValue().set("promo_item_stock_" + itemModel.getId(), itemModel.getStock()); }
控制层:由运维调用该方法
1 2 3 4 5 @GetMapping (value = "/publishpromo" )public CommonReturnType publishPromo (@RequestParam("id" ) Integer id) promoService.publishPromo(id); return CommonReturnType.create(null ); }
减库存操作
1 2 3 4 5 6 7 8 9 10 11 12 13 @Override @Transactional public boolean decreaseStock (Integer itemId, Integer amount) throws BusinessException Long result = redisTemplate.opsForValue().increment("promo_item_stock_" + itemId, amount.intValue() * -1 ); if (result >= 0 ){ return true ; }else { return false ; } }
问题:上面的操作会有数据库记录不一致问题
解决方案:使用异步消息扣减数据库库存
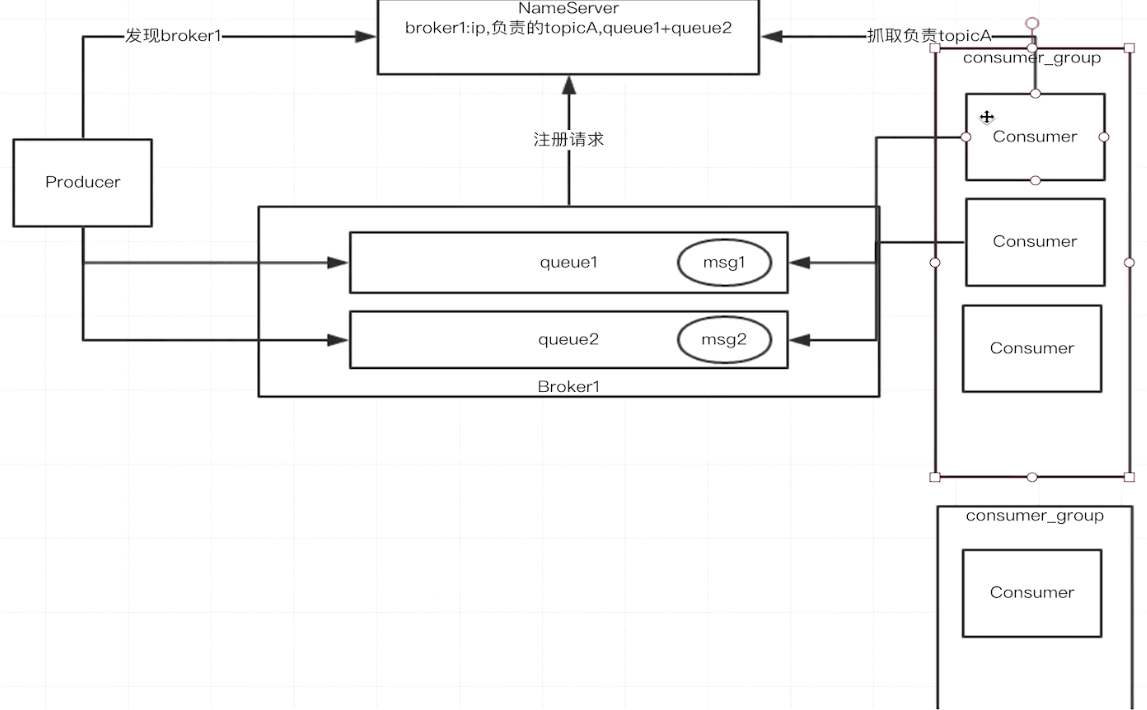
使用rockmq来发送异步消息
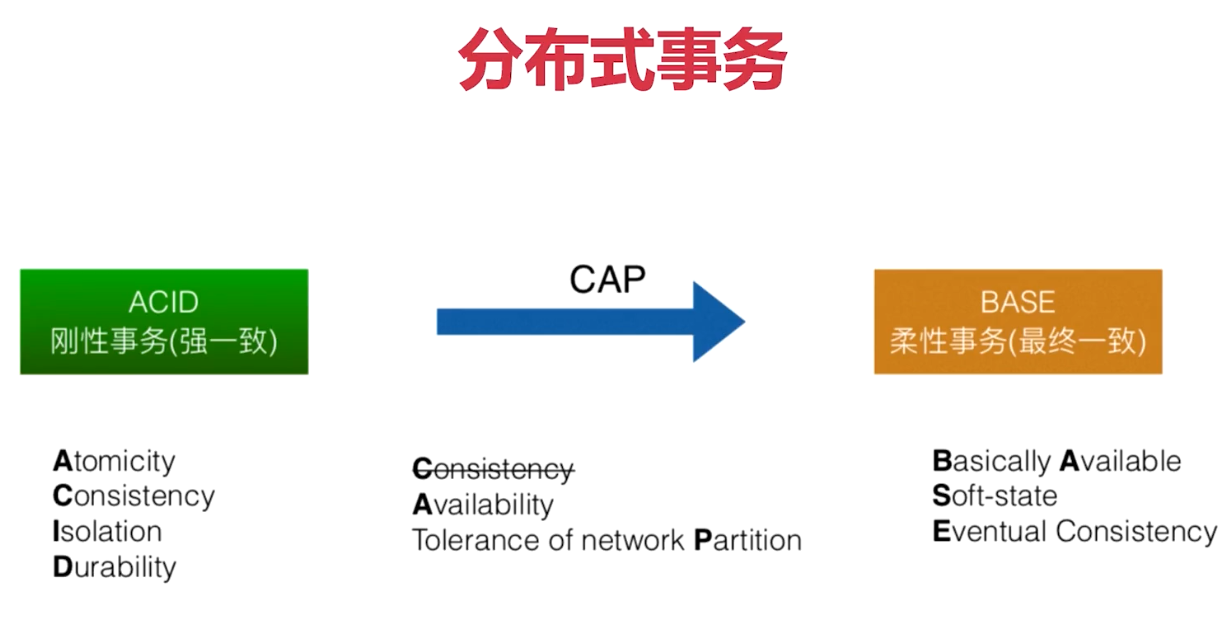
分布式事务
显然分布式事务中,无法同时满足CAP理论,因此BASE理论提出了柔性事务,即满足最终的一致性即可
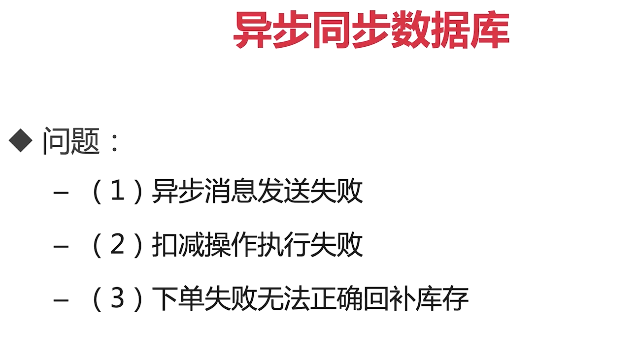
使用异步消息存在的问题
缺少下单的记录 ,一旦失败,无法回滚
交易性能优化之事务型消息 由于在下单的整个事务中,落单成功,但是入库可能失败,导致这个事务回滚,而库存却被扣减的问题。
思路1:在下单的整个事务之后添加一个后执行方法,允许扣减redis库存,但必须等事务提交了再发送异步消息到数据库库存,保证在事务发送回滚时,库存不会被扣减
1 2 3 4 5 6 7 8 9 10 11 12 13 TransactionSynchronizationManager.registerSynchronization( new TransactionSynchronization() { @Override public void afterCommit () boolean mqResult = itemService.asyncDecreaseStock(itemId, amount); } } );
上面的方法依然存在问题:无法保证异步消息绝对的可以被发送,如果刚好在afterCommit方法发送异常,就依然会导致库存更新失败。
思路2:使用rocketMQ的事务型消息
1 2 3 4 5 6 7 8 9 10 11 12 13 14 15 16 17 18 19 20 21 22 23 24 25 26 27 28 29 30 31 32 33 34 35 36 37 38 39 40 41 42 43 44 45 46 47 48 49 50 51 52 53 54 55 56 57 58 59 60 61 62 63 64 65 66 67 @PostConstruct public void init () throws MQClientException producer = new DefaultMQProducer("producer_group" ); producer.setNamesrvAddr(nameAddr); producer.start(); transactionMQProducer = new TransactionMQProducer("transaction_producer_group" ); transactionMQProducer.setNamesrvAddr(nameAddr); transactionMQProducer.start(); transactionMQProducer.setTransactionListener(new TransactionListener() { @Override public LocalTransactionState executeLocalTransaction (Message message, Object args) Integer itemId = (Integer) ((Map)args).get("itemId" ); Integer promoId = (Integer) ((Map)args).get("PromoId" ); Integer userId = (Integer) ((Map)args).get("UserId" ); Integer amount = (Integer) ((Map)args).get("amount" ); try { orderService.createOrder(userId, itemId, promoId, amount); } catch (BusinessException e) { e.printStackTrace(); return LocalTransactionState.ROLLBACK_MESSAGE; } return LocalTransactionState.COMMIT_MESSAGE; } @Override public LocalTransactionState checkLocalTransaction (MessageExt messageExt) return null ; } }); } public boolean transactionAsyncReduceStock (Integer userId, Integer promoId, Integer itemId, Integer amount) Map<String, Object> bodyMap = new HashMap<>(); Map<String, Object> argsMap = new HashMap<>(); bodyMap.put("itemId" , itemId); bodyMap.put("amount" , amount); argsMap.put("itemId" , itemId); argsMap.put("amount" , amount); argsMap.put("userId" , promoId); argsMap.put("promoId" , promoId); TransactionSendResult transactionSendResult = null ; Message message = new Message(topicName, "increase" , JSON.toJSON(bodyMap).toString().getBytes(Charset.forName("UTF-8" ))); try { transactionSendResult = transactionMQProducer.sendMessageInTransaction(message, argsMap); } catch (MQClientException e) { e.printStackTrace(); return false ; } if (transactionSendResult.getLocalTransactionState() == LocalTransactionState.ROLLBACK_MESSAGE){ return false ; }else if (transactionSendResult.getLocalTransactionState() == LocalTransactionState.COMMIT_MESSAGE){ return true ; }else { return false ; } }
然后直接在控制层调用transactionAsyncReduceStock方法即可:
该方法的逻辑为:bodyMap为要发送的消息,argsMap为参数,sendMessageInTransaction往rocketMQ发送消息的同时回调executeLocalTransaction方法并将参数传递进去,在该方法内部调用订单创建的方法。
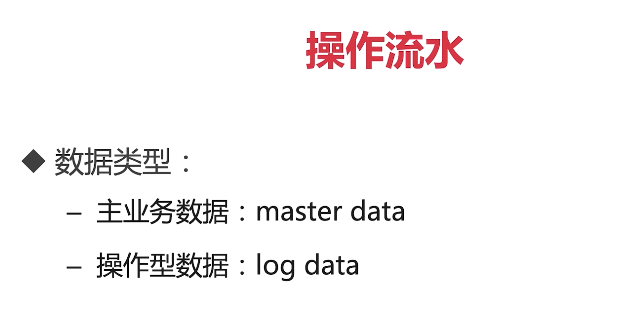
库存流水 上面的操作还存在一个本质问题,没有库存流水 ,也就是去redis查询时并不知道是哪一笔订单出了问题。
新建一张表来记录流水
1 2 3 4 5 6 7 8 9 10 11 DROP TABLE IF EXISTS `stock_log` ;CREATE TABLE `stock_log` ( `stock_log_id` varchar (64 ) COLLATE utf8_unicode_ci NOT NULL , `item_id` int NOT NULL DEFAULT '0' , `amount` int NOT NULL DEFAULT '0' , `status` int NOT NULL DEFAULT '0' COMMENT '//1表示初始状态,2表示下单扣减库存成功,3表示下单回滚' , PRIMARY KEY (`stock_log_id` ) ) ENGINE =InnoDB DEFAULT CHARSET =utf8 COLLATE =utf8_unicode_ci;
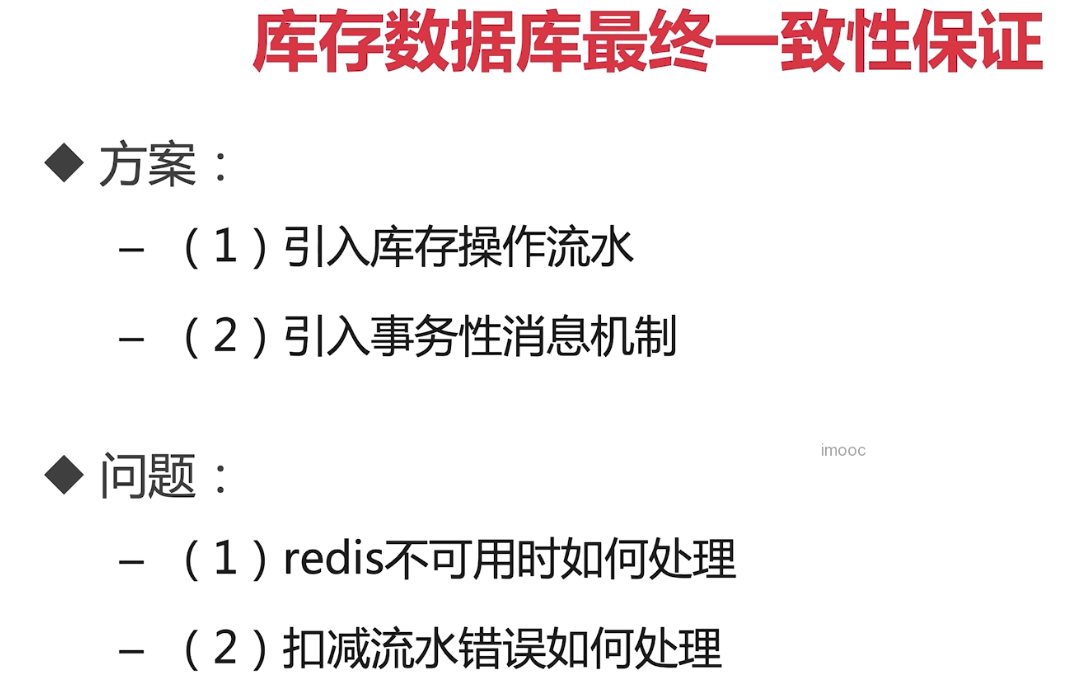
库存数据库最终一致性
设计原则 :
方案:
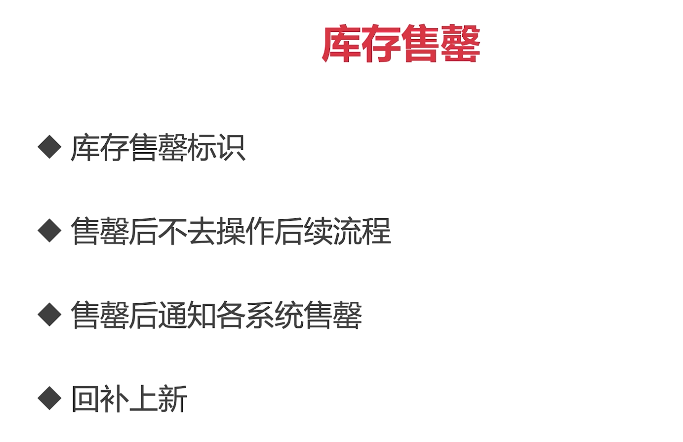
库存售罄
增加判断库存售空的情况:不进入下单流水号
1 2 3 4 5 6 7 8 9 10 11 12 13 14 15 16 17 18 19 20 21 22 23 24 25 @Override @Transactional public boolean decreaseStock (Integer itemId, Integer amount) throws BusinessException Long result = redisTemplate.opsForValue().increment("promo_item_stock_" + itemId, amount.intValue() * -1 ); if (result >= 0 ){ return true ; }else if (result == 0 ){ redisTemplate.opsForValue().set("promo_item_stock_invalid_" + itemId, "true" ); return true ; }else { increaseStock(itemId, amount); return false ; } } if (redisTemplate.hasKey("promo_item_stock_invalid_" + itemId)){ throw new BusinessException(EmBusinessError.STOCK_NOT_ENOUGH); }
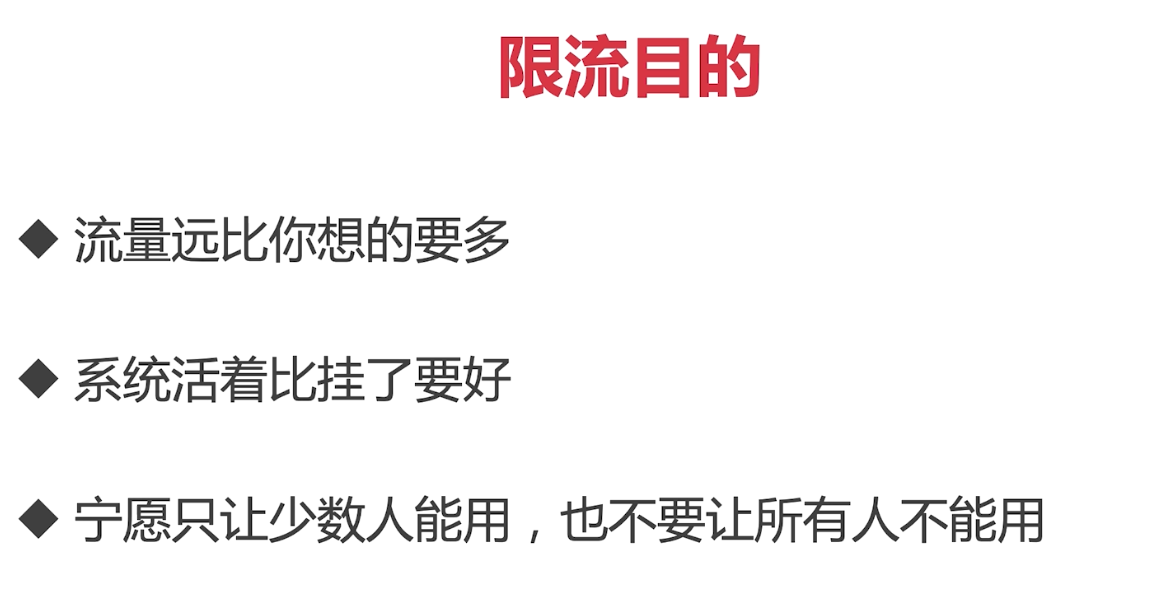
流量削峰 上面设计存在的问题:
使用秒杀令牌
1 2 3 4 5 6 7 8 9 10 11 12 13 14 15 16 17 18 19 20 21 22 23 24 25 26 @PostMapping (value = "/generatetoken" , consumes = CONTENT_TYPE_FORMED)public CommonReturnType generatetoken (@RequestParam("itemId" ) Integer itemId ,@RequestParam (name = "promoId" ) Integer promoId) throws BusinessException { String token = httpServletRequest.getParameterMap().get("token" )[0 ]; if (StringUtils.isEmpty(token)){ throw new BusinessException(EmBusinessError.USER_NOT_LOGIN, "用户未登录,不能下单" ); } UserModel userModel = (UserModel) redisTemplate.opsForValue().get(token); if (userModel == null ){ throw new BusinessException(EmBusinessError.USER_NOT_LOGIN, "用户未登录,不能下单" ); } String promoToken = promoService.generateSecondKillToken(promoId, itemId, userModel.getId()); if (promoToken == null ){ throw new BusinessException(EmBusinessError.PARAMETER_VALIDATION_ERROR, "生成令牌失败" ); } return CommonReturnType.create(promoToken); }
前端首先发送/generatetoken请求来获取令牌,,此时该令牌会发送到redis服务器,然后才可以进行下单的请求,下单请求将验证当前的令牌是否与redis中的令牌一致,由于
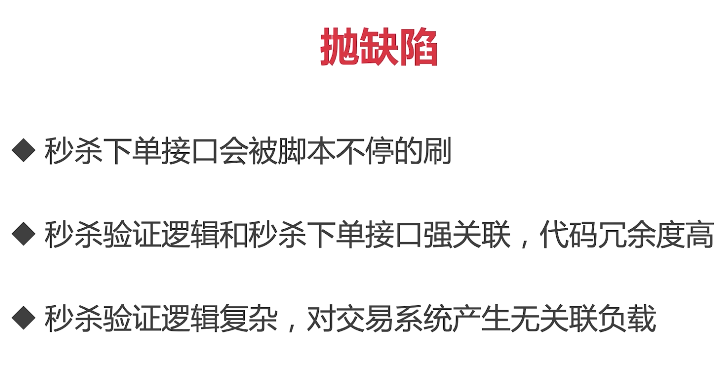
缺陷:秒杀令牌只要活动一开始就无限制生成,影响系统性能
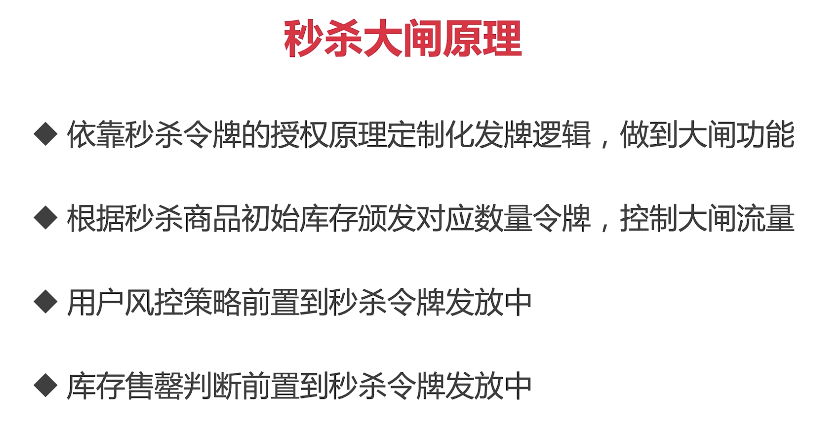
秒杀大闸原理 1 2 3 redisTemplate.opsForValue().set("promo_door_count_" + promoId, itemModel.getStock().intValue()*5 );
这样流量进来时,进行一个限流,只有itemModel.getStock().intValue()*5的用户才有秒杀资格。
缺陷:
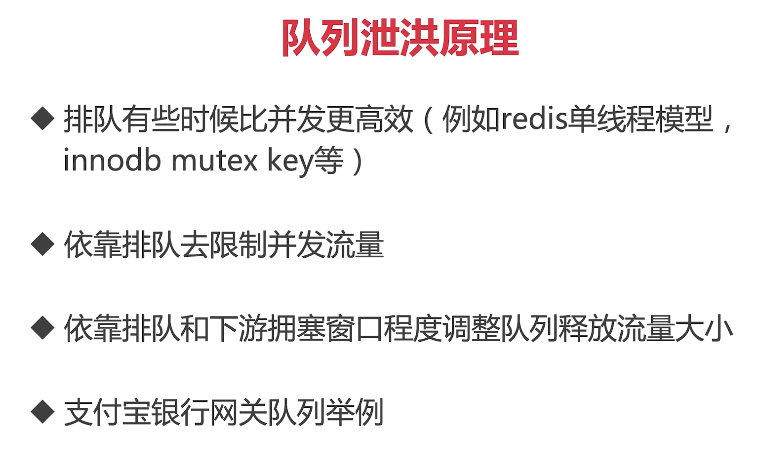
浪涌流量涌入后系统无法应对 多库存,多商品等令牌限制能力弱 队列泄洪原理
使用线程池:每次只允许20个线程去创建订单,其余用户进入等待队列
1 2 3 4 5 6 7 8 9 10 11 12 13 14 15 16 17 18 19 20 21 22 23 24 25 26 27 28 29 30 31 32 33 @PostConstruct public void init () executorService = Executors.newFixedThreadPool(20 ); } Future<Object> future = executorService.submit(new Callable<Object>() { @Override public Object call () throws Exception String stockLogId = itemService.initStockLog(itemId, amount); boolean b = mqProducer.transactionAsyncReduceStock(userModel.getId(), promoId, itemId, amount, stockLogId); if (!b) { throw new BusinessException(EmBusinessError.UNKONWN_ERROR, "下单失败" ); } return null ; } }); try { future.get(); } catch (InterruptedException e) { throw new BusinessException(EmBusinessError.UNKONWN_ERROR); } catch (ExecutionException e) { throw new BusinessException(EmBusinessError.UNKONWN_ERROR); }
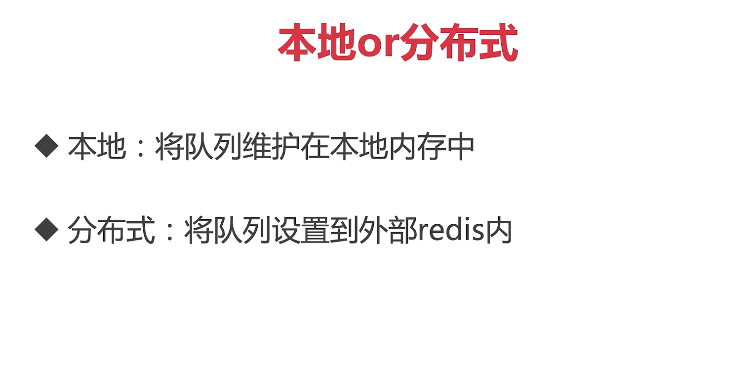
建议将队列维护在本地内存。因为redis有网络的消耗
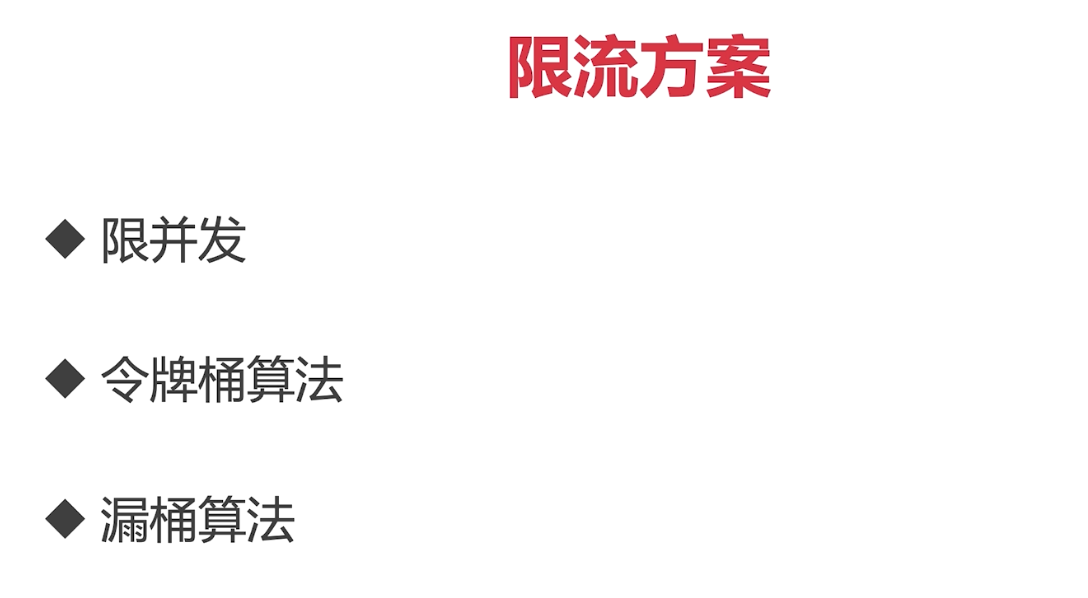
防刷限流技术 使用验证码防刷,此处省略。
在互联网项目中,一般使用令牌桶算法。
限流算法实现:基于谷歌的Guava
1 2 3 4 5 6 7 8 9 10 11 12 13 private RateLimiter orderCreateRateLimiter;@PostConstruct public void init () orderCreateRateLimiter = RateLimiter.create(300 ); } if (!orderCreateRateLimiter.tryAcquire()){ throw new BusinessException(EmBusinessError.RATELIMIT); }
防刷技术
总结
拓展 关于登录相关问题: session一般定义呆滞时间为30分钟时间。
安全性问题:Https和自定义协议(APP中一般使用二进制加密,如使用protobuf协议)
弱登录态:即推荐算法,不登陆也会智能推荐,需要在session会话结束前续命(模拟心跳:在js上设置一个定时器,每隔几秒向服务端发送一个keepalive请求 )。
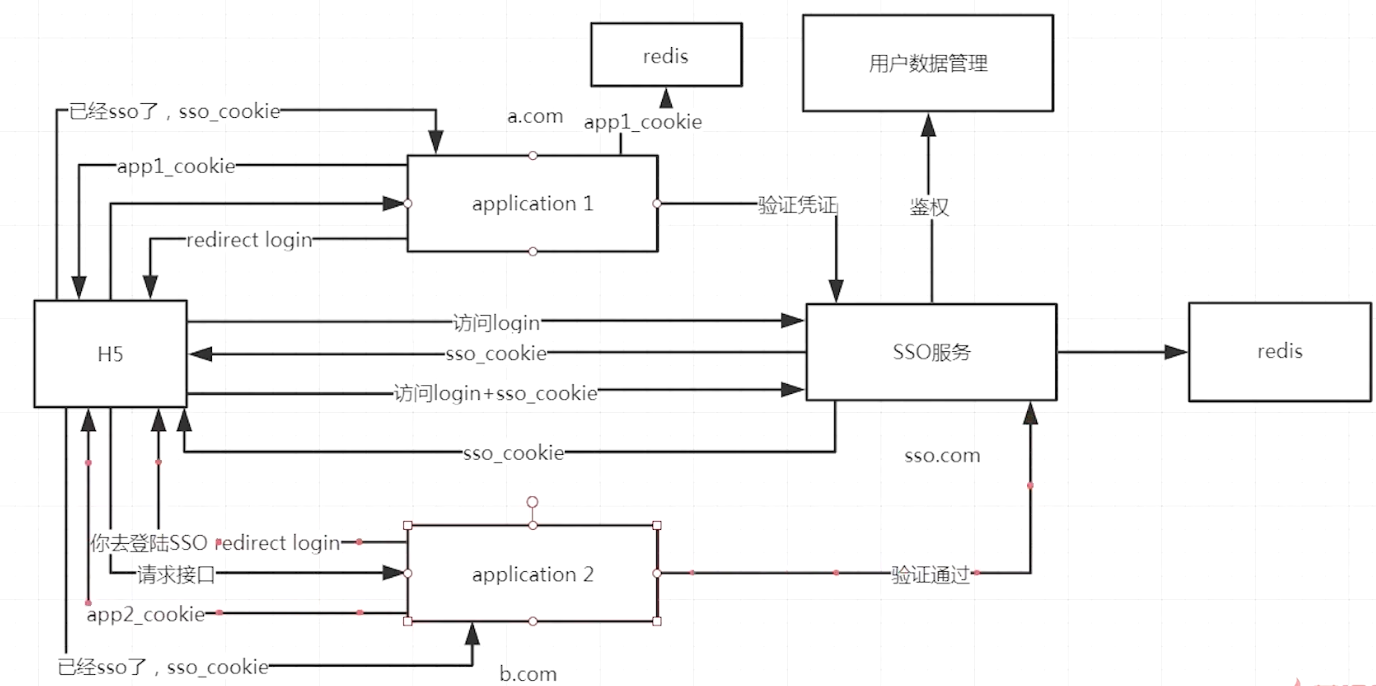
SSO单点登录:同一个域名只能有一个cookie且唯一,导致会出现访问不同页面需要重复登录的问题,因此需要单点登录。 分为以下三种情况:
同域名:cookie相同,SSO只需要保证使用同一个存储的ID即可。 跟域名相同而子域名不同:设置http的domain=/,这样设置,服务器只会关注根域名 ,从而生成相同的cookie 域名都不相同 :
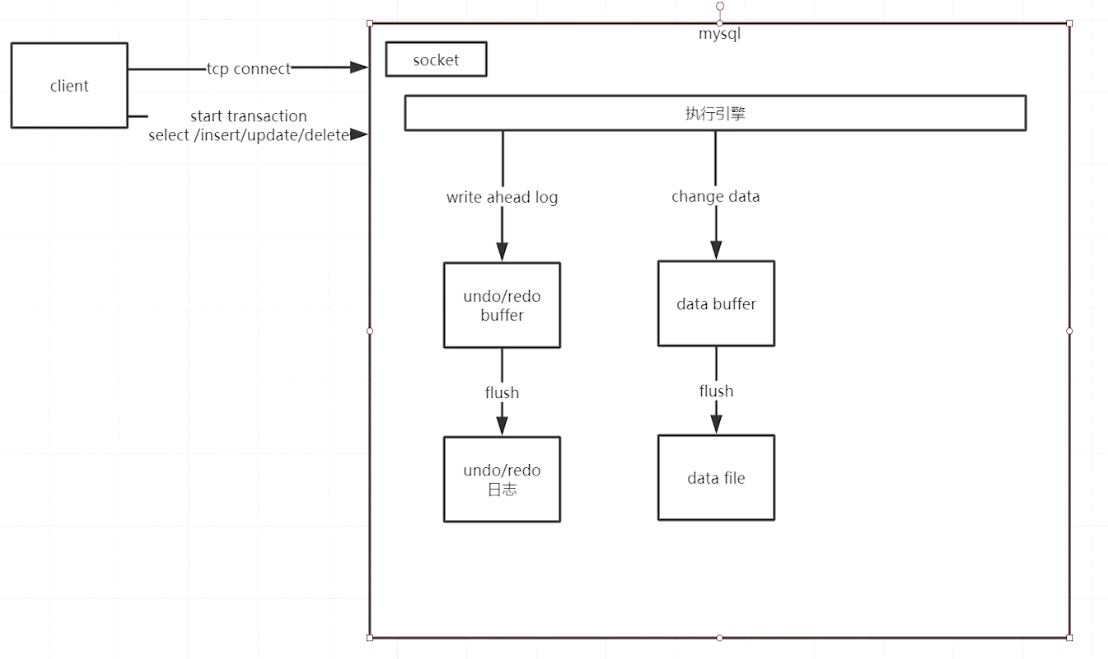
mysql性能提升以下均以innodb引擎为例 。
秘诀:遇到性能优化问题,使用:
缓存 异步 批处理 :批量insert,批量update,避免for循环批处理示例:
1 2 3 4 for each {insert into table values (1 ) } Execute once insert into table values (1 ) ,(2 ) ,(3 ) ,(4 ) ... ;
批量写的优势:
Sql编译N次和1次的时间与空间复杂度 网络消耗的时间复杂度 磁盘寻址的复杂度 使用索引
mysql单机性能优化
参数优化:
max_connection=1000 innodb_file_per_table=1。即每个table作为一张表文件,而不是一个全部表在一个文件中。 innodb_buffer_pool_size=1G。数据读写时,先读写buffer。该参数一般设为内存60-70%。 innodb_log_file_size=256M innodb_log_buffer_size=16M innodb_flush_log_at_trx_commit= 2。即undo/redo日志先写入文件系统,但不执行flush操作,由于写入文件系统时(缓存区域)已经是linux操作系统内核态的操作级别,只要系统不断电就一定能写入成功,然后再依次进行flush操作 。需要放在[mysqld_safe]节点 innodb_data_file_path=ibdata1:1G;ibdata2:1G;ibdata3:1G:auto extend。设置文件大小到1g时新建文件
mysql分布式扩展
开启bin log 色湖之主从同步账号,配置主从同步。